前言
提示
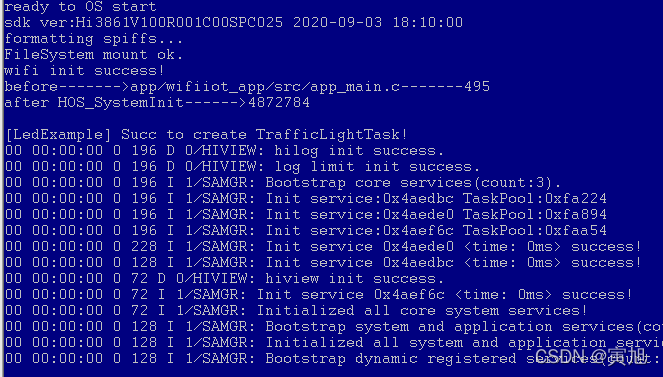
一、实验5:程序启动流程验证
1.按照路径找到这个文件:
![]()
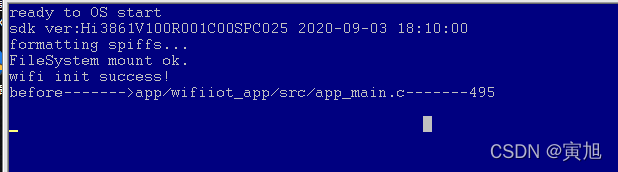
2.更改

编译、烧写、运行、查询后→
3.结果实现IPOP:
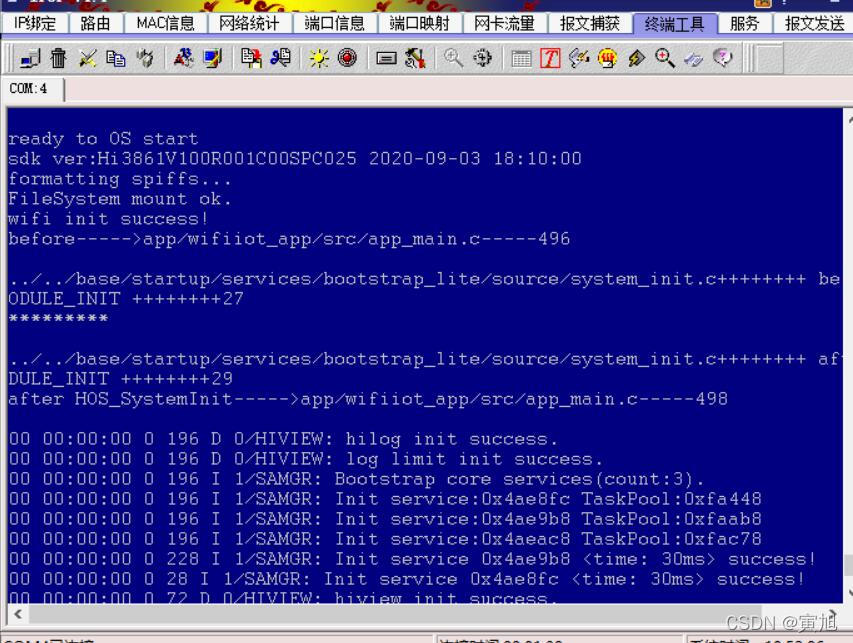
说明应用程序运行是在HOS_SystemInit();完成的。
二、实验六:代码实现LED灯亮灭
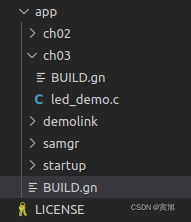
1.目录:新建ch03项目,建立.c BUILD.gn
2.代码如下:
//ch03/led_demo.c

#include
#include"ohos_init.h"
#include
#include"wifiiot_gpio.h"
#include"wifiiot_gpio_ex.h"
#include"ohos_types.h"
void leddemo(void)
{
    GpioInit();//初始化GPIO设备
    IoSetFunc(WIFI_IOT_IO_NAME_GPIO_9,WIFI_IOT_IO_FUNC_GPIO_9_GPIO);
    GpioSetDir(WIFI_IOT_IO_NAME_GPIO_9,WIFI_IOT_GPIO_DIR_OUT);
    GpioSetOutputVal(WIFI_IOT_IO_NAME_GPIO_9,WIFI_IOT_GPIO_EDGE_FALL_LEVEL_LOW);
    printf("led点n");
    usleep(4000000);
    GpioSetOutputVal(WIFI_IOT_IO_NAME_GPIO_9,WIFI_IOT_GPIO_EDGE_RISE_LEVEL_HIGH);
    printf("led熄灭n");

}
SYS_RUN(leddemo);
//ch03/BUILD.gn
static_library("ch03_demo"){
sources=[
"led_demo.c",
]
include_dirs=[
"//utils/native/lite/include",
"//base/iot_hardware/interfaces/kits/wifiiot_lite",
]
}
//app/BUILD.gn
import("//build/lite/config/component/lite_component.gni")

lite_component("app") {

    features = [


        "ch03:ch03_demo"

    ]

}
3.查询结果:

三、实验七:代码实现交通灯功能
1.创建traffic_light_demo.c文件,初始化
代码如下(示例):
//ch04/BUILD.gn
static_library("chapter_03_demo")
{sources=[
    #"led_demo.c",
    "traffic_demo.c",
    ]i
    nclude_dirs=[
        "//utils/native/lite/include",
        "//kernel/liteos_m/components/cmsis/2.0",
        "//base/iot_hardware/interfaces/kits/wifiiot_lite",
        ]
    }
//ch04/traffic_demo.c
#include
#include
#include"ohos_init.h"
#include"cmsis_os2.h"
#include"wifiiot_gpio.h"
#include"wifiiot_gpio_ex.h"
void init(void)
{
GpioInit();
IoSetFunc(WIFI_IOT_IO_NAME_GPIO_10,WIFI_IOT_IO_FUNC_GPIO_10_GPIO);
GpioSetDir(WIFI_IOT_IO_NAME_GPIO_10,WIFI_IOT_GPIO_DIR_OUT);
IoSetFunc(WIFI_IOT_IO_NAME_GPIO_11,WIFI_IOT_IO_FUNC_GPIO_11_GPIO);
GpioSetDir(WIFI_IOT_IO_NAME_GPIO_11,WIFI_IOT_GPIO_DIR_OUT);
IoSetFunc(WIFI_IOT_IO_NAME_GPIO_12,WIFI_IOT_IO_FUNC_GPIO_12_GPIO);
GpioSetDir(WIFI_IOT_IO_NAME_GPIO_12,WIFI_IOT_GPIO_DIR_OUT);
}
static void StartTrafficLightTask(void)
{
init();
while(1)
{
GpioSetOutputVal(WIFI_IOT_IO_NAME_GPIO_11,WIFI_IOT_GPIO_VALUE1);usleep(3000*1000);GpioSetOutputVal(WIFI_IOT_IO_NAME_GPIO_11,WIFI_IOT_GPIO_VALUE0);
GpioSetOutputVal(WIFI_IOT_IO_NAME_GPIO_12,WIFI_IOT_GPIO_VALUE1);usleep(1000*1000);GpioSetOutputVal(WIFI_IOT_IO_NAME_GPIO_12,WIFI_IOT_GPIO_VALUE0);
GpioSetOutputVal(WIFI_IOT_IO_NAME_GPIO_10,WIFI_IOT_GPIO_VALUE1);usleep(3000*1000);GpioSetOutputVal(WIFI_IOT_IO_NAME_GPIO_10,WIFI_IOT_GPIO_VALUE0);
}
}
APP_FEATURE_INIT(StartTrafficLightTask);
//app/BUILD.gn
import("//build/lite/config/component/lite_component.gni")

lite_component("app") {

    features = [

        #"projectname:library"change time

        "ch04:chapter_03_demo"

    ]

}
2.结果如下
四、实验八:控制蜂鸣器发出声音
1.创建bee_demo.c文件,初始化
代码:
//bee_demo.c
#include
#include
#include"ohos_init.h"
#include"cmsis_os2.h"
#include"wifiiot_gpio.h"
#include"wifiiot_gpio_ex.h"
#include"wifiiot_pwm.h"
#include"hi_pwm.h"

void init(void)
{
    GpioInit();//蜂鸣器引脚设置为PWM功能
    IoSetFunc(WIFI_IOT_IO_NAME_GPIO_9,WIFI_IOT_IO_FUNC_GPIO_9_PWM0_OUT);
    PwmInit(WIFI_IOT_PWM_PORT_PWM0);
}
void BeeperDemo(void)
{
    init();
    while(1)
    {
        uint16_t freqDivisor=5000;//占空比,频率
        PwmStart(WIFI_IOT_PWM_PORT_PWM0,freqDivisor/2,freqDivisor);
        usleep(2000000);
        PwmStop(WIFI_IOT_PWM_PORT_PWM0);
        usleep(1000000);
    }
}
SYS_RUN(BeeperDemo);
//ch05/BUILD.gn

static_library("ch05_demo")
{
    sources=[
        #"led_demo.c",
        #"beeper_music_demo.c",
        #"traffic_light_demo.c",
        "bee_demo.c",
        ]
        include_dirs=[
            "//utils/native/lite/include",
            "//kernel/liteos_m/components/cmsis/2.0",
            "//base/iot_hardware/interfaces/kits/wifiiot_lite",
            ]
        }
//ch05/BUILD.gn
import("//build/lite/config/component/lite_component.gni")

lite_component("app") {

    features = [

        #"projectname:library"change time,

        #"ch04:chapter_03_demo",

        "ch05:ch05_demo",

    ]

}
1.修改:
![]()

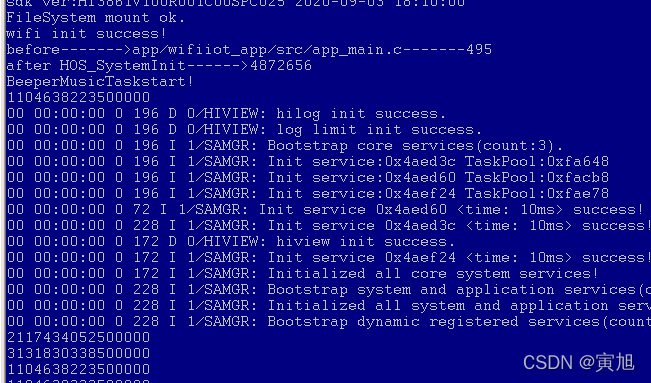
1.结果:
五、实验九:蜂鸣器实现播放音乐(大体同上)
1.代码和实现
//beeper.c

#include
#include
#include"ohos_init.h"
#include"cmsis_os2.h"
#include"wifiiot_gpio.h"
#include"wifiiot_gpio_ex.h"
#include"wifiiot_watchdog.h"
#include"wifiiot_pwm.h"
#include"hi_pwm.h"
static volatile int g_buttonPressed=0;
static const uint16_t g_tuneFreqs[]={
    0,//40MHz对应的分频系数:
    38223,//1046.5
    34052,//1174.7
    30338,//1318.5
    28635,//1396.9
    25511,//1568
    22728,//1760
    20249,//1975.5
    51021//5_783.99//第一个八度的5
};
//曲谱音符
static const uint8_t g_scoreNotes[]={
    //《两只老虎》简谱:http://www.jianpu.cn/pu/33/33945.htm
    1,2,3,1,1,2,3,1,3,4,5,
    3,4,5,5,6,5,4,3,1,5,6,5,4,3,1,1,8,1,1,8,1,
    //最后两个5应该是低八度的,链接图片中的曲谱不对,声音到最后听起来不太对劲
    };//曲谱时值
static const uint8_t g_scoreDurations[]={
        4, 4, 4,4,4,  4,  4,4, 4,4,8, 4,4,8,
        3,1,3,1,4,4, 3,1,3,1,4,4, 4,4,8, 4,4,8,
    };
static void *BeeperMusicTask(const char *arg)
{
    (void)arg;
    printf("BeeperMusicTaskstart!rn");
    hi_pwm_set_clock(PWM_CLK_XTAL);//设置时钟源为晶体时钟(40MHz,默认时钟源160MHz)
    while(1)
    {
        for(size_t i=0;i< sizeof(g_scoreNotes) / sizeof(g_scoreNotes[0]);i++)
        {
            uint32_t tune=g_scoreNotes[i];//音符
            uint16_t freqDivisor=g_tuneFreqs[tune];
            uint32_t tuneInterval=g_scoreDurations[i]*(125*1000);//音符时间
            printf("%d%d%d%drn",tune,(40*1000*1000)/freqDivisor,freqDivisor,tuneInterval);
            PwmStart(WIFI_IOT_PWM_PORT_PWM0,freqDivisor/2,freqDivisor);
            usleep(tuneInterval);
            PwmStop(WIFI_IOT_PWM_PORT_PWM0);
        }
    }
    return NULL;
}

static void StartBeepMusicTask(void)
{
    osThreadAttr_t attr;
    GpioInit();
    //蜂鸣器引脚设置为PWM功能
    IoSetFunc(WIFI_IOT_IO_NAME_GPIO_9,WIFI_IOT_IO_FUNC_GPIO_9_PWM0_OUT);
    PwmInit(WIFI_IOT_PWM_PORT_PWM0);
    WatchDogDisable();
    attr.name="BeeperMusicTask";
    attr.attr_bits=0U;
    attr.cb_mem=NULL;
    attr.cb_size=0U;
    attr.stack_mem=NULL;
    attr.stack_size=1024;
    attr.priority=osPriorityNormal;
    if(osThreadNew((osThreadFunc_t)BeeperMusicTask,NULL,&attr)==NULL)
    {
        printf("[LedExample]FaliedtocreateBeeperMusicTask!n");
    }
}
SYS_RUN(StartBeepMusicTask);
//ch06/BUILD.gn
static_library("ch06_demo")
{sources=[
    #"led_demo.c",
    #"traffic_light_demo.c",
    #"beeper_demo.c",
    "beeper.c",
    ]
    include_dirs=[
        "//utils/native/lite/include",
        "//kernel/liteos_m/components/cmsis/2.0",
        "//base/iot_hardware/interfaces/kits/wifiiot_lite",
        ]
}
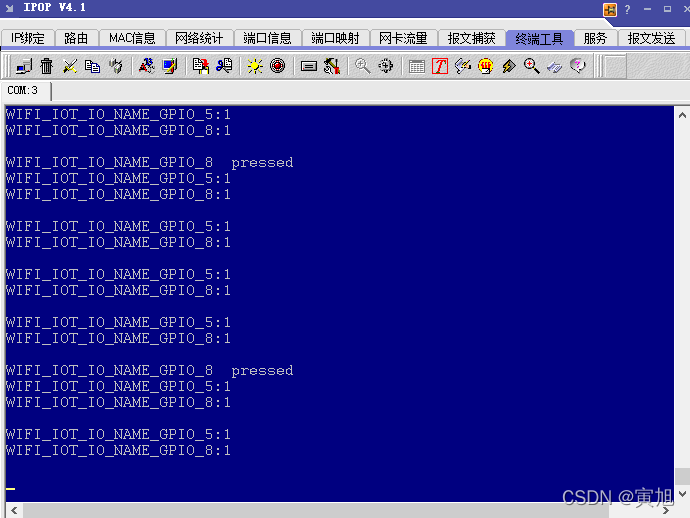
六、拓展实验29:按键处理
1.代码和实现
//user_key.c
#include
#include
#include "ohos_init.h"
#include "cmsis_os2.h"
#include "wifiiot_gpio.h"
#include "wifiiot_gpio_ex.h"
#include "hi_gpio.h"
#include "wifiiot_adc.h"
int button_5 = 0;
static void *UserKeyTask(const char *arg)
{
    arg = arg;
    hi_gpio_value gpio_val = HI_GPIO_VALUE1;
    while (1)
    {
        hi_gpio_get_input_val(WIFI_IOT_IO_NAME_GPIO_5, &gpio_val);
        printf("WIFI_IOT_IO_NAME_GPIO_5:%dnr",gpio_val);
        hi_gpio_get_input_val(WIFI_IOT_IO_NAME_GPIO_8, &gpio_val);
        printf("WIFI_IOT_IO_NAME_GPIO_8:%dnrnr",gpio_val);
        usleep(1000 * 1000);
    }
    return NULL;
}

static void OnButtonPressed(char *arg)
{
    (void)arg;
    GpioUnregisterIsrFunc(WIFI_IOT_IO_NAME_GPIO_8);
    printf("WIFI_IOT_IO_NAME_GPIO_8  pressednr");
    GpioRegisterIsrFunc(WIFI_IOT_IO_NAME_GPIO_8, WIFI_IOT_INT_TYPE_EDGE, WIFI_IOT_GPIO_EDGE_FALL_LEVEL_LOW,OnButtonPressed, NULL);
}

static void StartUserKeyTask(void)
{
    osThreadAttr_t attr;
    GpioInit();
    IoSetFunc(WIFI_IOT_IO_NAME_GPIO_8, WIFI_IOT_IO_FUNC_GPIO_8_GPIO); //button
    GpioSetDir(WIFI_IOT_IO_NAME_GPIO_8, WIFI_IOT_GPIO_DIR_IN);
    IoSetPull(WIFI_IOT_IO_NAME_GPIO_8, WIFI_IOT_IO_PULL_UP);
    IoSetFunc(WIFI_IOT_IO_NAME_GPIO_5, WIFI_IOT_IO_FUNC_GPIO_5_GPIO); //oled_button
    GpioSetDir(WIFI_IOT_IO_NAME_GPIO_5, WIFI_IOT_GPIO_DIR_IN);
    GpioRegisterIsrFunc(WIFI_IOT_IO_NAME_GPIO_8, WIFI_IOT_INT_TYPE_EDGE,WIFI_IOT_GPIO_EDGE_FALL_LEVEL_LOW,OnButtonPressed, NULL);
    attr.name = "UserKeyTask";
    attr.attr_bits = 0U;
    attr.cb_mem = NULL;
    attr.cb_size = 0U;
    attr.stack_mem = NULL;
    attr.stack_size = 1024;
    attr.priority = osPriorityNormal;

    if (osThreadNew((osThreadFunc_t)UserKeyTask, NULL, &attr) == NULL)
    {
        printf("[LedExample] Falied to create UserKeyTask!n");
    }
    printf("rn[LedExample] Succ to create UserKeyTask!n");
}
APP_FEATURE_INIT(StartUserKeyTask);
//BUILD.gn
static_library("demo")
{sources=[
#"led_demo.c",
#"traffic_demo.c",
#"bee_demo.c",
#"beeper.c",
"user_key.c"
]
include_dirs=[
"//utils/native/lite/include",
"//kernel/liteos_m/components/cmsis/2.0",
"//base/iot_hardware/interfaces/kits/wifiiot_lite",
"//vendor/hisi/hi3861/hi3861/third_party/lwip_sack/include",
"//foundation/communication/interfaces/kits/wifi_lite/wifiservice",
"//third_party/pahomqtt/MQTTPacket/src",
"//third_party/pahomqtt/MQTTPacket/samples",
"//vendorhisihi3861hi3861componentsatsrc",
]
}
七、拓展实验30:交通灯按键控制
1.代码和实现
总结
提示:这里对文章进行总结:
例如:以上就是今天要讲的内容,本文仅仅简单介绍了pandas的使用,而pandas提供了大量能使我们快速便捷地处理数据的函数和方法。


