背景
在应用开发中,我们的流程为:开发-测试-预发布-发布 AppStrore
所以就会有不同的环境,比如开发环境,测试环境,预发布环境以及正式环境。
那么就会产生配置不同环境的如下需求。
- 不同环境设置不同 host ,应用图标(可选)
- 能够快速查看环境、版本号、build 号等信息
- 能够配合自动打包
根据是否需要编译重新打包分为以下两种方式
- App 内动态切换
- 多环境配置打包编译切换
App 内动态切换
这种方式我们可以通过创建影藏入口,在影藏入口的页面内切换环境(同时,我们也可以将环境,版本号,build号等信息在页面内显示)。
优点:不需要再次打包。
这里的原理主要靠代码逻辑和本地化记录来实现切换。
多环境配置打包编译
我们配置多个环境的配置文件(Configuration Setting file),通过编译打包选择对应的配置,来达到切换环境,改变应用图标等功能。
这里我使用多 Schemes + ConfigurationSettingFile 的形式。
添加 Configuration
Xcode 项目默认有 Debug 和 Release 两个配置。显然是不够用的。
首先在 Xcode 中打开项目,选中 PROJECT, 选中 Info
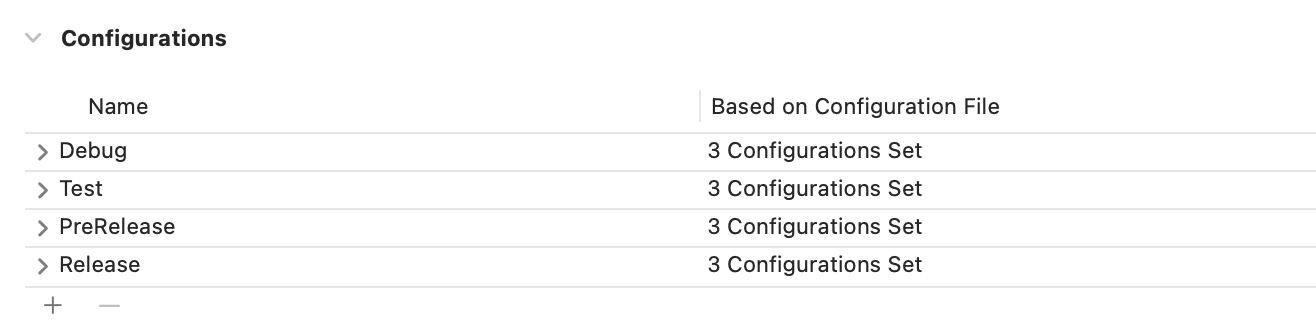
找到Configurations点击底部的 +,然后复制一份 Debug。
如下图:
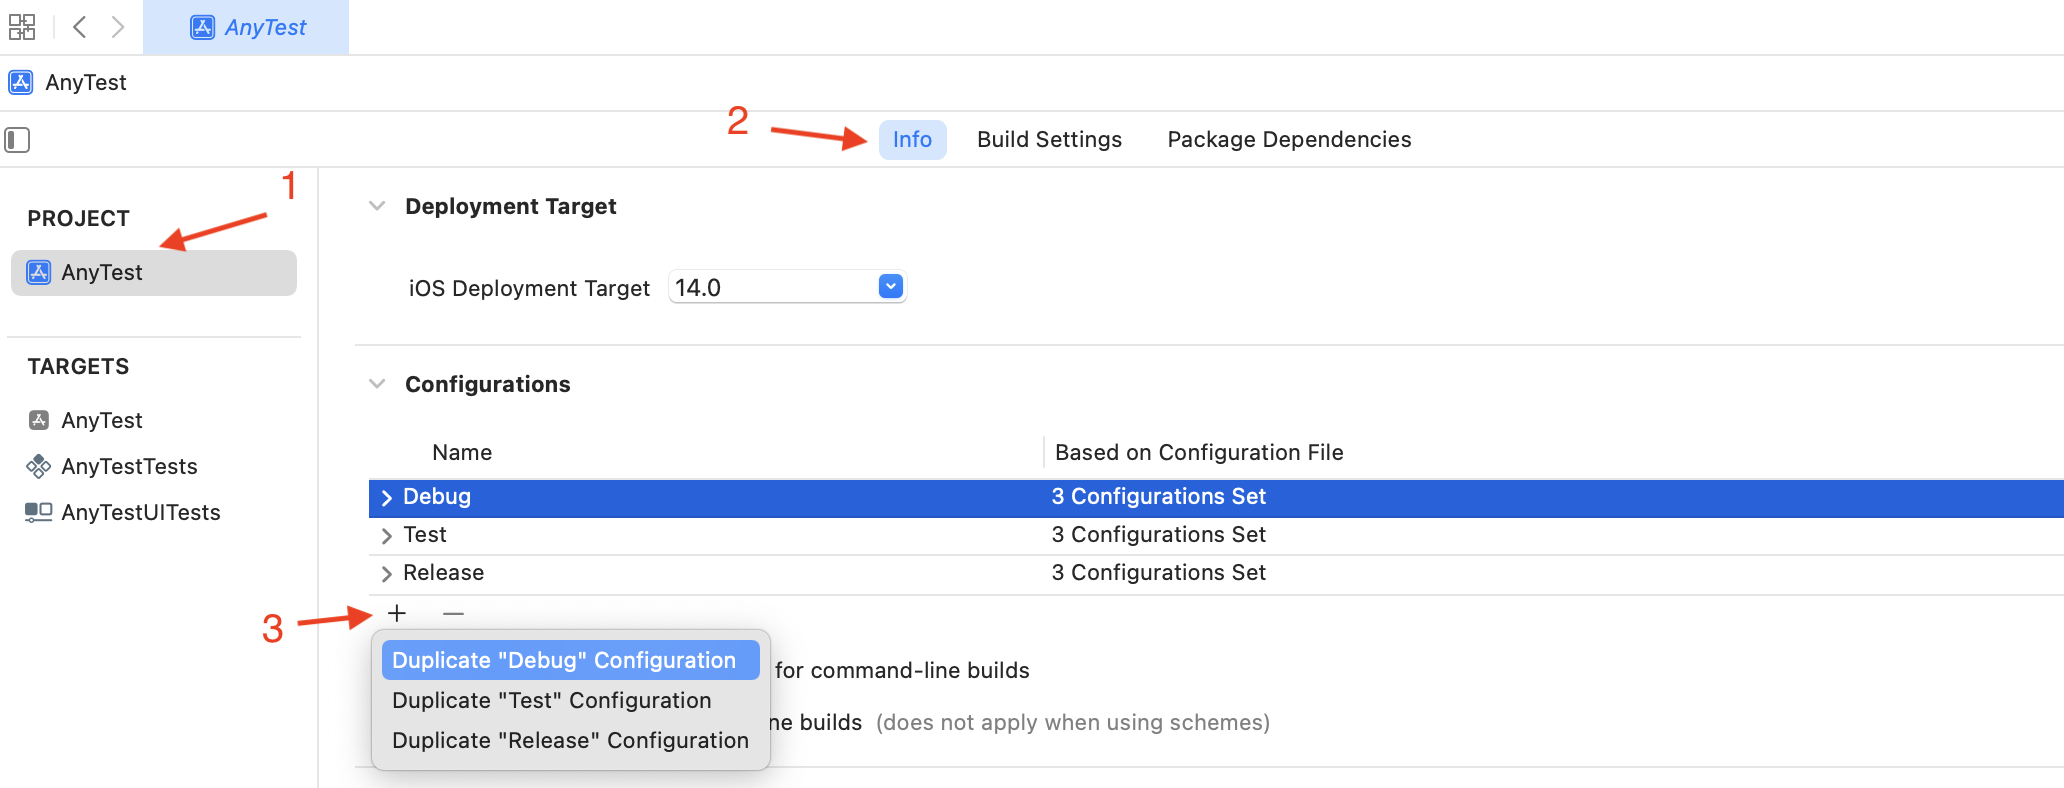
同样的方式,我们创建了 Test 和 PreRelease
User-Defined
User-Defined可以在 Build Seting 中自定义参数,可以通过点击 +来添加自定义参数,以便在 Info.plist 或者 编译中参数使用。

在配置文件中添加的 key-value 等同与添加User-Defined 参数(即,最后配置文件中的 key-value 都会同步到这边来)
User-Defined 的使用可以iOS 开发,利用 Build Configuration + Schemes 多环境配置中二.创建 User-Defined Setting]
注意:User-Defined 分为 PROJECT 和 TARGETS 级别,建议在对应 TARGET 中添加
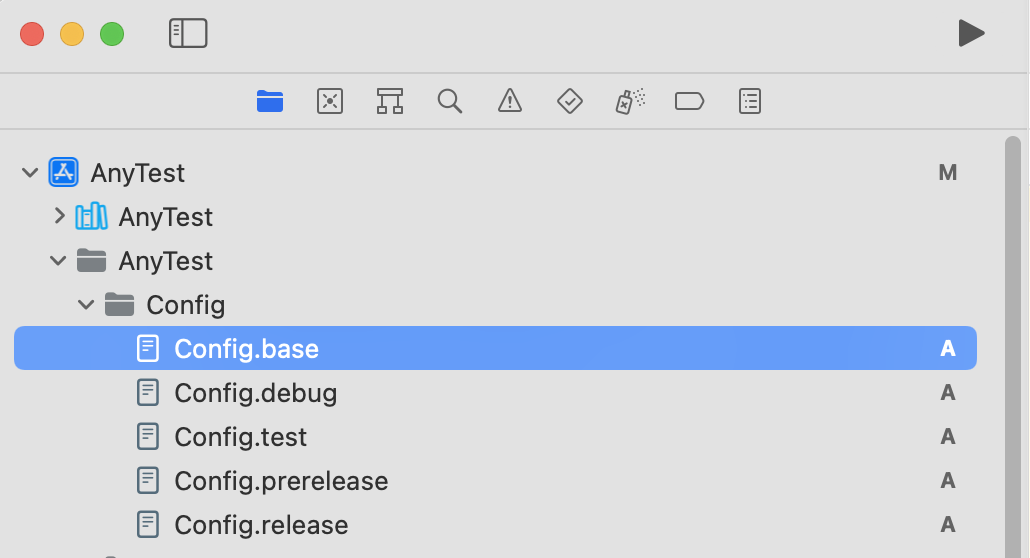
添加 Configuration Setting File
Configuration Setting File 是为了更好的管理配置项,避免参数分散在 Build Setting 中。
Configuration Setting 文件是可以继承的。建议设置一个``Base`Configuration Setting 文件。
通过新建文件的方式可以创建 Configuration Setting File

这里我创建了一个base和其他四个对应环境的 Configuration Setting 文件。
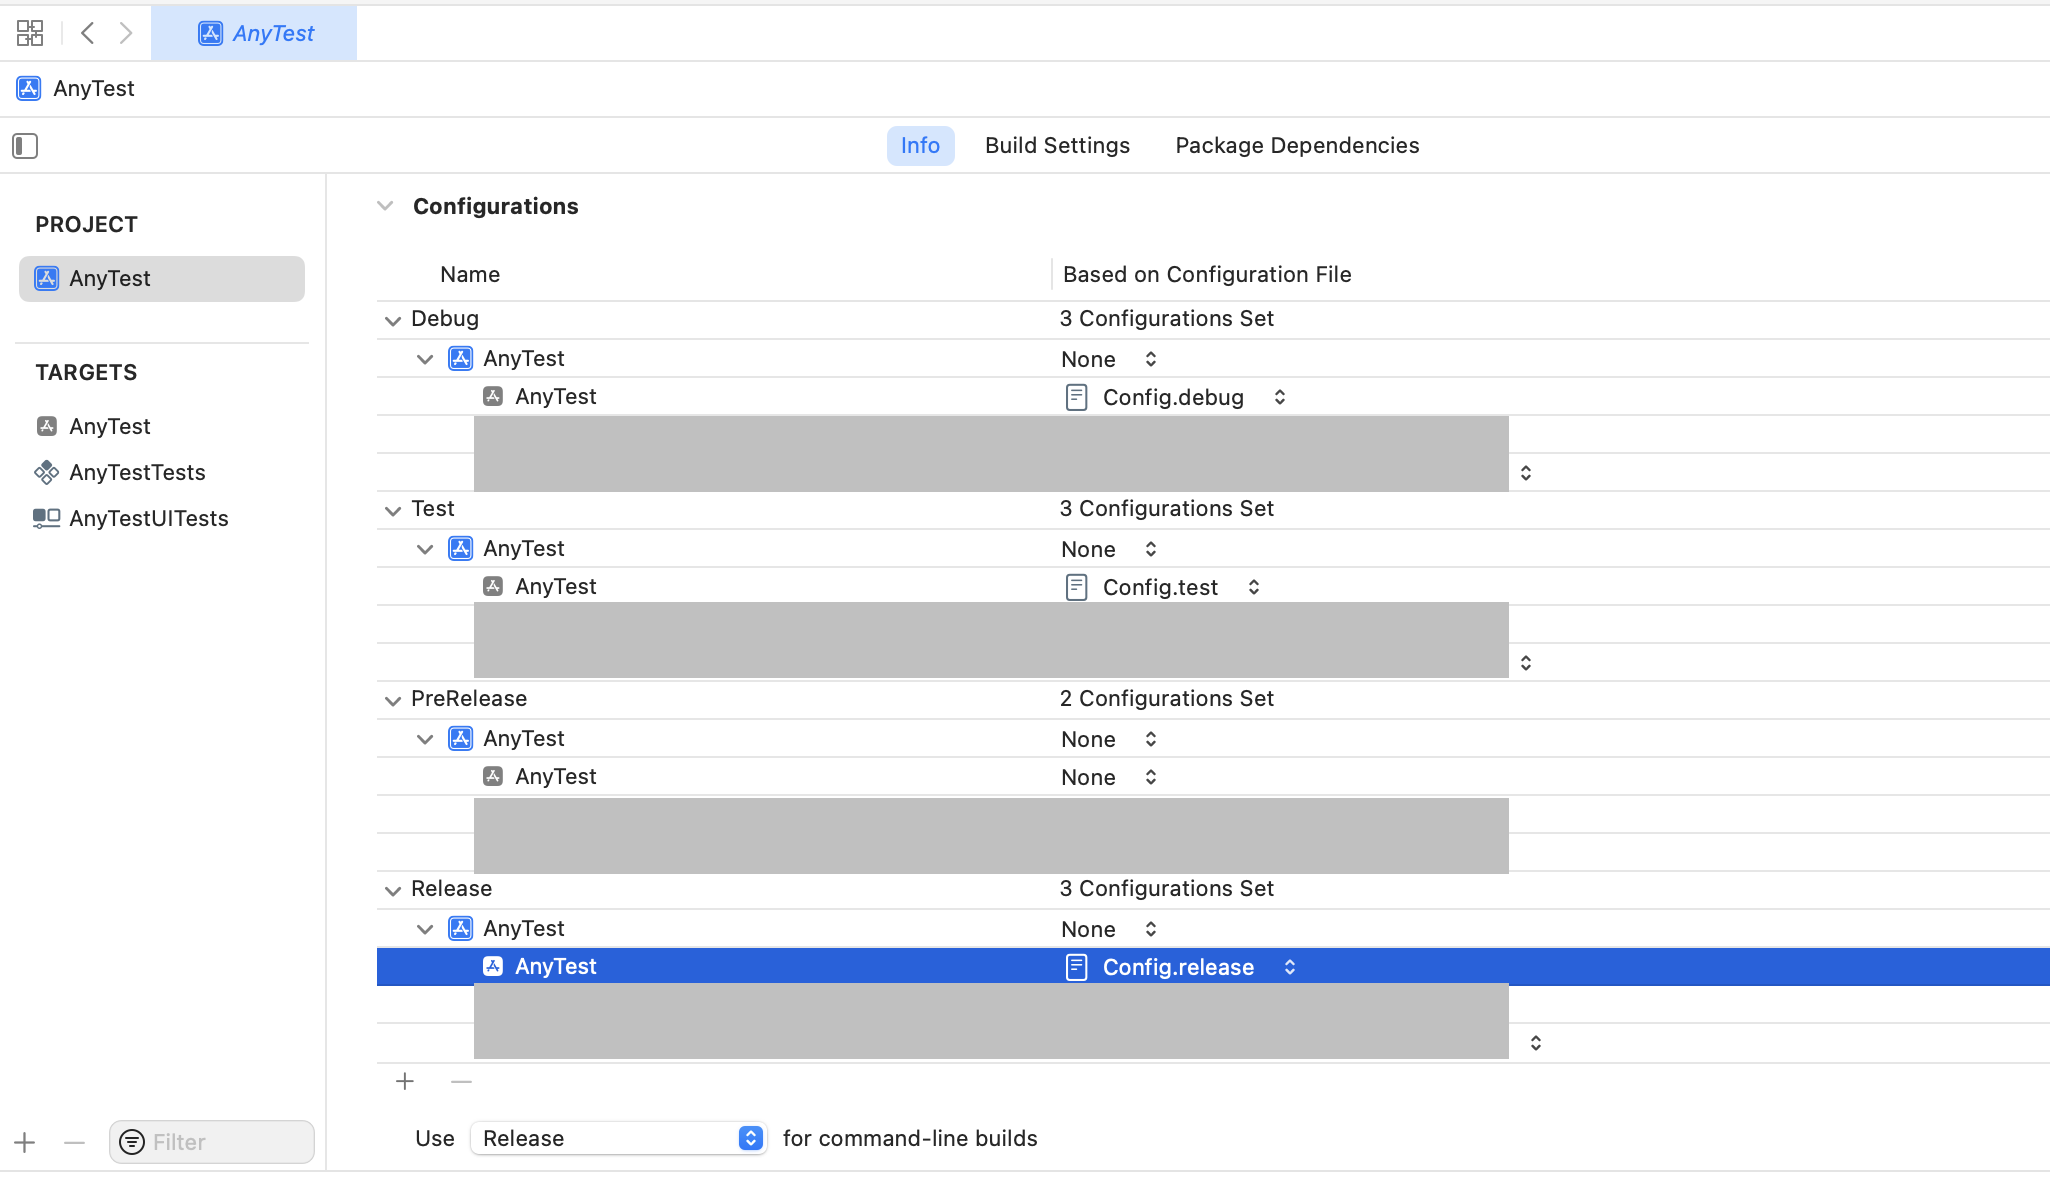
接下来,就是为你的每一个环境匹配对应的配置文件。
如果你使用了 Cocoapods。
你编译的时候可能会遇到Unable to load contents of file list: '/Target Support Files/Pods-AnyTest/Pods-AnyTest-frameworks-PreRelease-input-files.xcfilelist'错误。
这个时候需要在终端,重新执行pod install
执行后,你有可能遇到下面警告
[!] CocoaPods did not set the base configuration of your project because your project already has a custom config set. In order for CocoaPods integration to work at all, please either set the base configurations of the target `AnyTest` to `Target Support Files/Pods-AnyTest/Pods-AnyTest.debug.xcconfig` or include the `Target Support Files/Pods-AnyTest/Pods-AnyTest.debug.xcconfig` in your build configuration (`AnyTest/Config/Config.debug.xcconfig`).

[!] CocoaPods did not set the base configuration of your project because your project already has a custom config set. In order for CocoaPods integration to work at all, please either set the base configurations of the target `AnyTest` to `Target Support Files/Pods-AnyTest/Pods-AnyTest.test.xcconfig` or include the `Target Support Files/Pods-AnyTest/Pods-AnyTest.test.xcconfig` in your build configuration (`AnyTest/Config/Config.test.xcconfig`).

[!] CocoaPods did not set the base configuration of your project because your project already has a custom config set. In order for CocoaPods integration to work at all, please either set the base configurations of the target `AnyTest` to `Target Support Files/Pods-AnyTest/Pods-AnyTest.release.xcconfig` or include the `Target Support Files/Pods-AnyTest/Pods-AnyTest.release.xcconfig` in your build configuration (`AnyTest/Config/Config.release.xcconfig`).

[!] CocoaPods did not set the base configuration of your project because your project already has a custom config set. In order for CocoaPods integration to work at all, please either set the base configurations of the target `AnyTestTests` to `Target Support Files/Pods-AnyTestTests/Pods-AnyTestTests.prerelease.xcconfig` or include the `Target Support Files/Pods-AnyTestTests/Pods-AnyTestTests.prerelease.xcconfig` in your build configuration (`AnyTest/Config/Config.prerelease.xcconfig`).
别紧张,我们现在就去修复
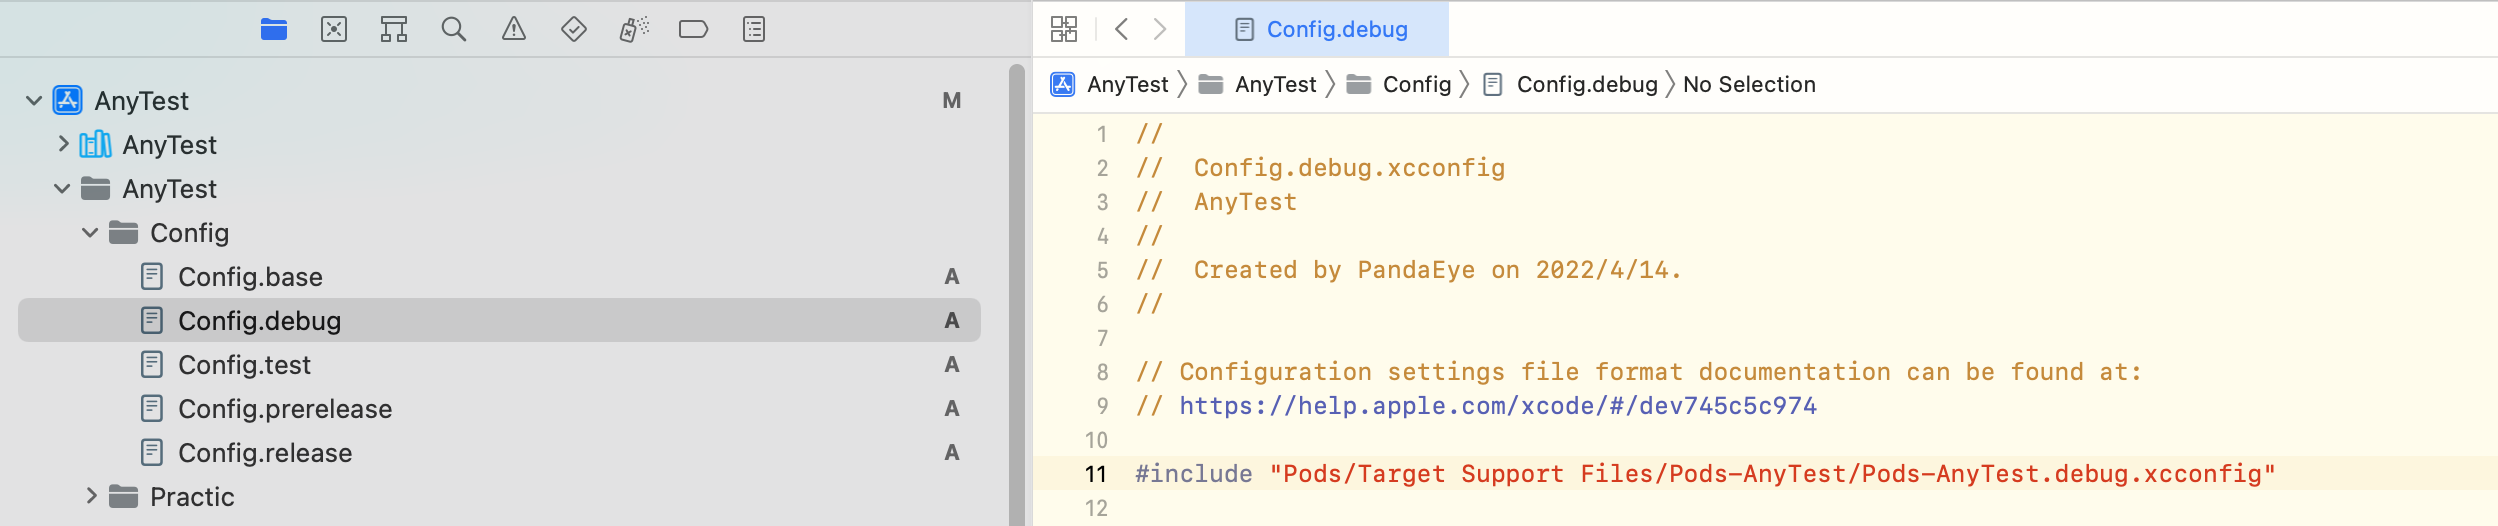
现在打开,我们的 Config.debug 配置文件,必须继承 Cocoapods 的对应环境的配置文件,以便 Cocoapods能正确运行。
现在再编译,就可以编译成功了。
相同的操作,我们把其他环境的 pod 继承也对应添加进去。
创建 Scheme
为了我们快速选择编译运行环境,我们应该创建对应环境的 Scheme.
选中项目-> New Scheme ,创建
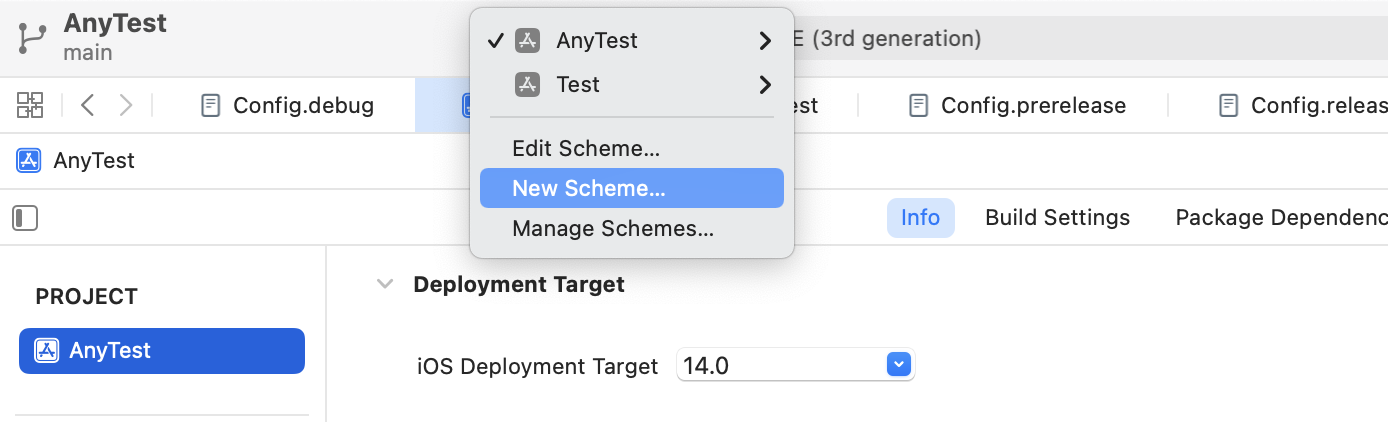
默认创建的 Scheme 不可以改名字,你可能删除后创建一个新命名的 Scheme
如下图,创建了对应环境的 Scheme.
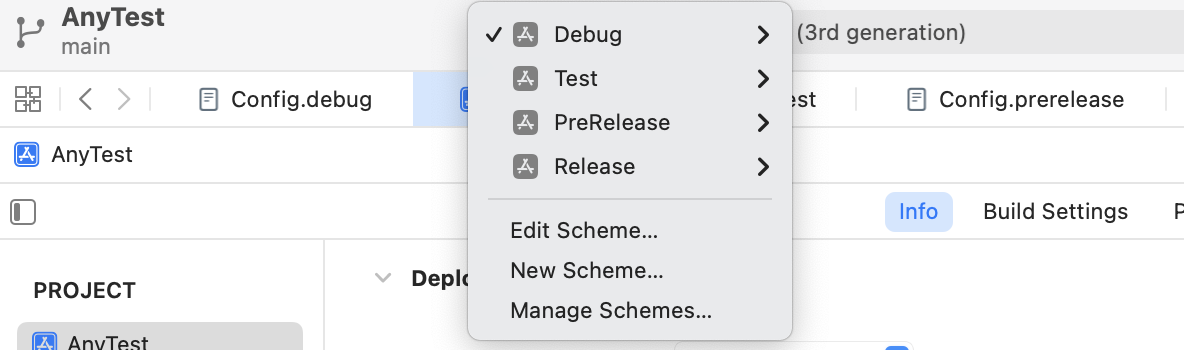
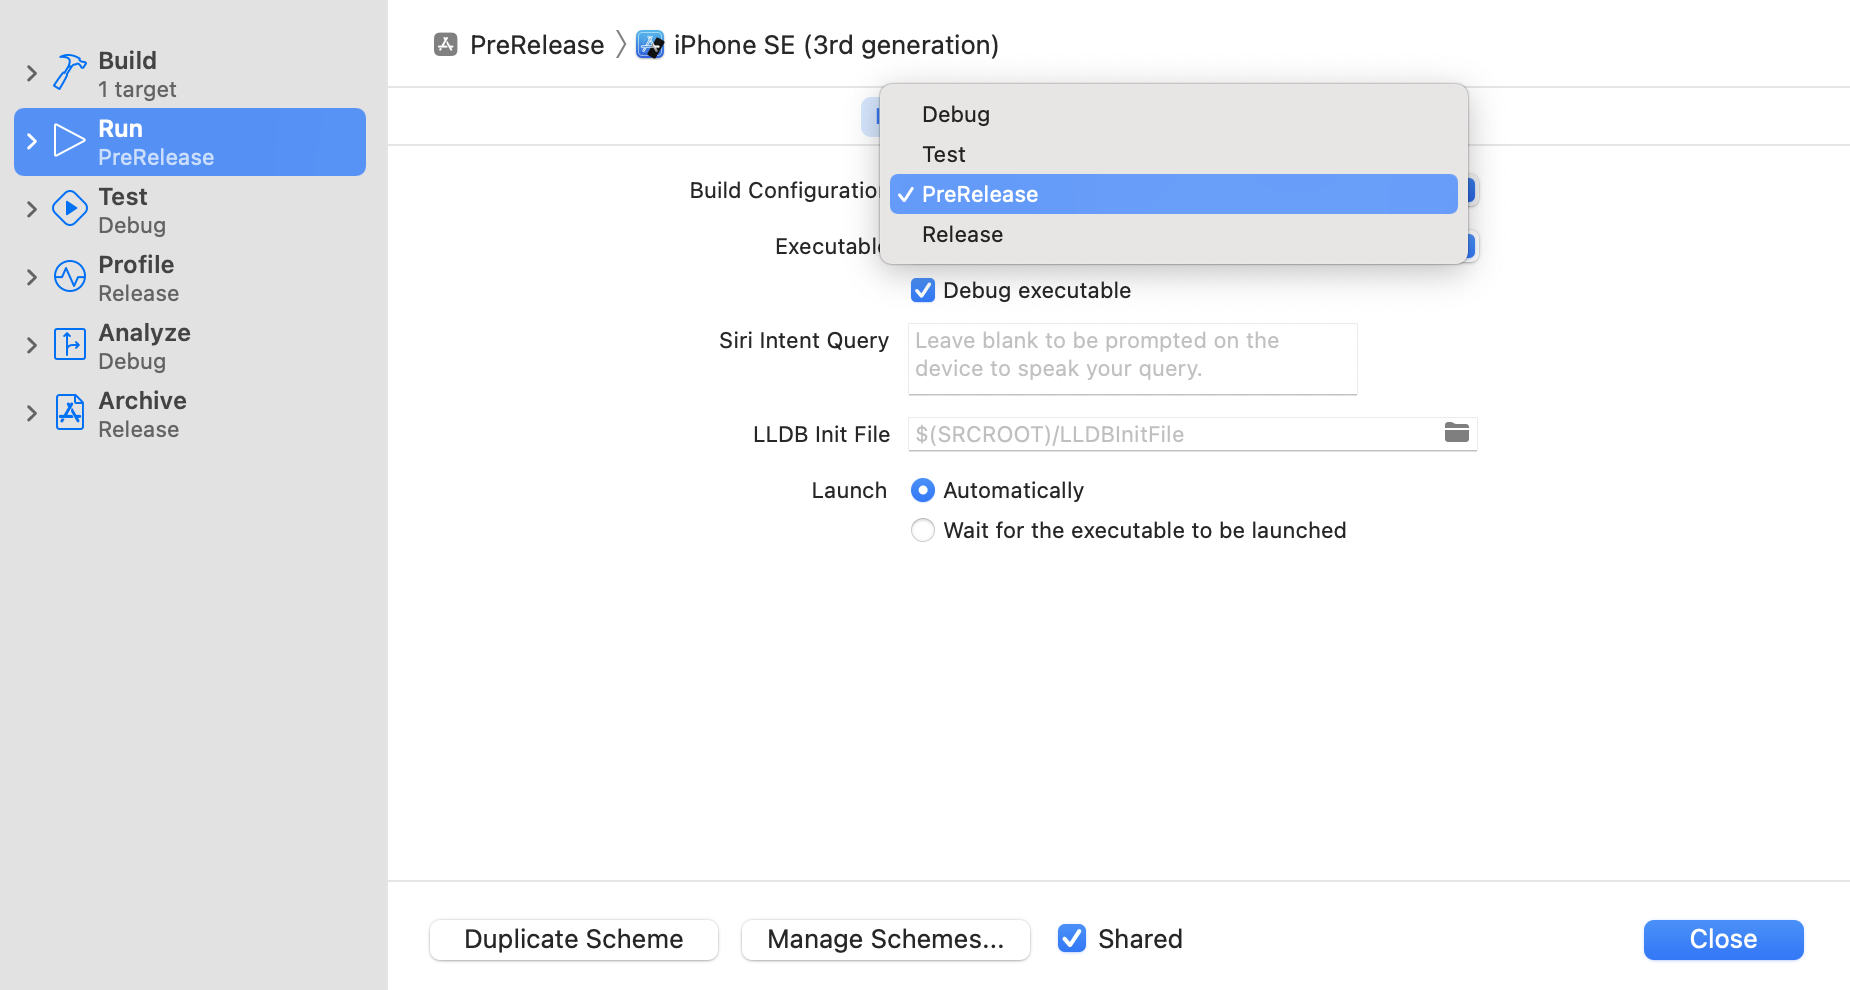
新建的 Scheme 的 Build Configuration 默认是以 Debug 为基础的。所以我们需要编辑每一个 Scheme,以确保它与编译配置一一对应。
添加配置参数
在 base 中定义公共参数,以便公共控制
Config.base 配置文件示例
APP_NAME = AnyTest  // 应用名
APP_ICON = AppIcon  // 图标名
BUNDLE_ID = com.xxx.AnyTest //包名
HOST_URL = www.base.com // 后端地址
Config.debug 配置文件示例
#include "Config.base.xcconfig"       // 继承 base,以便公共控制
#include "Pods/Target Support Files/Pods-AnyTest/Pods-AnyTest.debug.xcconfig" // 继承 cocopods 以便其正常工作

APP_NAME = ${inherited}Debug  // = AnyTestDebug
APP_ICON = ${inherited}Debug   //= AppIconDebug
BUNDLE_ID = ${inherited}.Debug //= com.xxx.AnyTest.debug
HOST_URL = www.debug.com
其他三个文件类似 Config.debug 去设置。
不同环境 Host 获取
通过添加自定义字段在 info.plist 获取
在 target info 中添加一个字段Host_URL,设置值为$(HOST_URL)

在代码中通过读取 info.plist 方式获取
func readHostURLFromInfoPlist() -> String? {
        guard let path = Bundle.main.path(forResource: "Info", ofType: "plist") else {
            return nil
        }
        let infoDic = NSDictionary(contentsOfFile: path)
        let host = infoDic?["Host_URL"] as? String
        return host
    }
如果不想通过添加 Configuration Setting File来配置 host url ,也可以通过 target -> build setting -> Preprocessor Macros 来定义不同环境的标记,在代码中通过条件编译来区分 host
设置不同环境的应用名
同样,通过将 info.plist 中的应用名字段修改为配置文件中定义的 Key

注意:应用名称不是 Bundle name 哈
设置不同环境包名
同理,在info.plist 文件中将 key 修改为配置文件中的 key 即可

tip:生成不同包名,就会生成不同应用哟
设置不同环境图标
为了能看到图标就知道是什么环境的,可以让设计添加对呀环境的水印,来达到所见即所得。
同样是可以在 info.plist 中将对应 Key 设置为配置文件定义 Key
如何在运行时改变 App 的图标
利用 ImageMagic可以实现动态更新图标,将重要信息(环境水印,version, build version 等)写在图标上。
参考如何在运行时改变 App 图标 或者 iOS App 图标添加版本信息
示例源代码https://github.com/CodeOcenS/multiConfig
扩展
Xcode Build Settings
包含了 Xcode 编译参数和各种解释和定义,可以在编写脚本时查询
Xcode Build Setting 整理 – 中文解释版本
Xcode Build Setting 常用设置


