上一节中介绍了点云配准的基础知识。本节将采用python open3d来进行点云配准。
open3d安装和点云配准介绍,请参考:
Open3d读写ply点云文件_Coding的叶子的博客-CSDN博客1 Open3d 安装Open3d是由Intel发布的一个开源库,支持快速开发和处理3D数据。Open3D在c++和Python中公开了一组精心选择的数据结构和算法。后端是高度优化的,并且是为并行化而设置的。Open3d直接使用pip安装即可。解决下载慢的问题,请切换下载源。设置方式请参考:python pip_Coding的叶子的博客-CSDN博客。pip install open3dply点云格式介绍请参考:点云格式介绍(二)_Codin...https://blog.csdn.net/suiyingy/article/details/124296483 点云配准(一)— ICP方法_Coding的叶子的博客-CSDN博客点云配准——ICP方法介绍
https://blog.csdn.net/suiyingy/article/details/124336448
如上一节中介绍,点云配准的ICP方法分为两大类,点到点和点到平面。open3d 中提供了这两种方法,分别用到o3d.pipelines.registration.TransformationEstimationPointToPoint和o3d.pipelines.registration.TransformationEstimationPointToPlane。本节仅介绍点到点的使用方式,点到面的后续再进行补充。
配准样例数据下载地址:python点云配准样例数据-深度学习文档类资源-CSDN下载。
下载下来的点云文件有bun000.ply和bun045.ply,open3d读写ply点云文件请参考:。
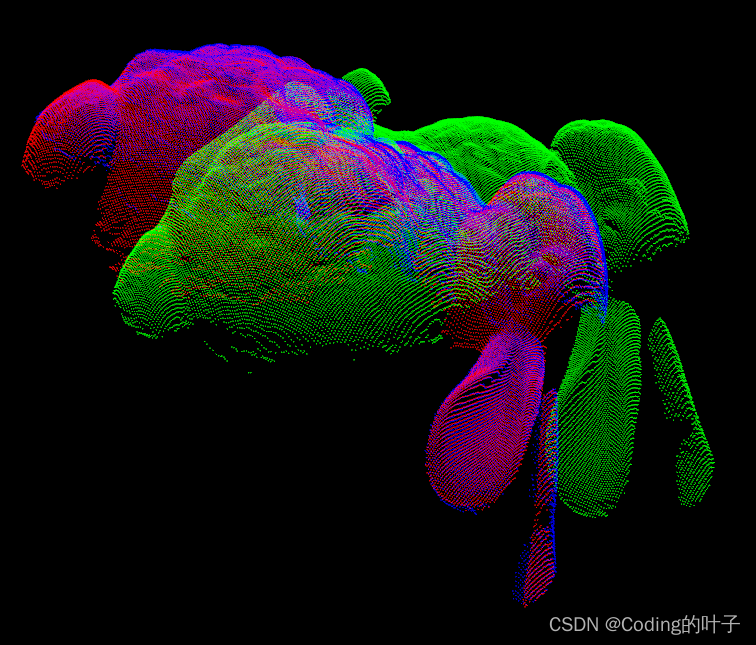
这里用bun000.ply的点云作为原始点云,对应代码中的points1,结果显示中绿色部分点云;bun045.ply作为目标点云,对应代码中的points2,结果显示中蓝色部分点云。代码中points3是points1配准到points2上的结果,对应结果显示张绿色部分的点云。
参考代码
# -*- coding: utf-8 -*-
"""
Created on Sat Apr 16 08:51:41 2022

@author: https://blog.csdn.net/suiyingy
"""
from mayavi import mlab
import numpy as np
import open3d as o3d

def ply_read(file_path):
    lines = []
    with open(file_path, 'r') as f:
        lines = f.readlines()
    return lines


#将每一行数据分割后转为数字
def ls2n(line):
    line = line.strip().split(' ')
    return list(map(float, line))


def viz_mayavi_3(points1, points2,   points3):
    x = points1[:, 0]# x position   of point
    y = points1[:, 1]# y position   of point
    z = points1[:, 2]# z position   of point
    fig = mlab.figure(bgcolor=(0, 0, 0), size=(640, 360))
    mlab.points3d(x, y, z, z, mode="point", color=(0, 1,  0), figure=fig)

    x = points2[:, 0]# x position   of point
    y = points2[:, 1]# y position   of point
    z = points2[:, 2]# z position   of point
    mlab.points3d(x, y, z, z, mode="point", color=(1, 0,  0), figure=fig)

    x = points1[:, 0]# x position   of point
    y = points1[:, 1]# y position   of point
    z = points1[:, 2]# z position   of point
    mlab.points3d(x, y, z, z, mode="point", color=(0, 0,  1), figure=fig)

    mlab.show()

if __name__ == '__main__':
    file_path = 'bun000.ply'
    points = ply_read(file_path)
    points = points[24:(24+40256)]
    points1 = np.array(list(map(lambda x: ls2n(x), points)))

    file_path = 'bun045.ply'
    points = ply_read(file_path)
    points = points[24:(24+40097)]
    points2 = np.array(list(map(lambda x: ls2n(x), points)))

    threshold = 0.2 #距离阈值
    trans_init = np.array([[1.0, 0.0, 0.0, 0.0],
                           [0.0, 1.0, 0.0,   0.0],
                           [0.0, 0.0, 1.0, 0],
                           [0.0, 0.0, 0.0,   1.0]])
    #计算两个重要指标,fitness计算重叠区域(内点对应关系/目标点数)。越高越好。
    #inlier_rmse计算所有内在对应关系的均方根误差RMSE。越低越好。
    source = o3d.geometry.PointCloud()
    source.points = o3d.utility.Vector3dVector(points1)
    target = o3d.geometry.PointCloud()
    target.points = o3d.utility.Vector3dVector(points2)
    print("Initial alignment")
    print(source)
    icp = o3d.pipelines.registration.registration_icp(
            source, target, threshold, trans_init,
            o3d.pipelines.registration.TransformationEstimationPointToPoint())
    print(icp)
    source.transform(icp.transformation)
    print(icp.transformation)
    points3 = np.array(source.points)
    viz_mayavi_3(points1, points2, points3)
配准效果图
python三维点云研究计划_Coding的叶子的博客-CSDN博客_3d点云 python将按照以下目录持续进行更新……点云格式介绍、点云可视化、点云投影、生成鸟瞰图、生成前视图、点云配准、点云分割、三维目标检测、点云重建、深度学习点云算法……https://blog.csdn.net/suiyingy/article/details/124017716点云配准(一)— ICP方法_Coding的叶子的博客-CSDN博客点云配准——ICP方法介绍
https://blog.csdn.net/suiyingy/article/details/124336448 更多三维、二维感知算法和金融量化分析算法请关注“乐乐感知学堂”微信公众号,并将持续进行更新。


