从0开始搭建一个项目
用到的技术:springboot+vue+mybatis+elementui+mysql
1.创建springboot项目
1.引入pom依赖
    <dependencies>
<!--        模板引擎-->
        <dependency>
            <groupId>org.springframework.boot</groupId>
            <artifactId>spring-boot-starter-thymeleaf</artifactId>
        </dependency>
<!--        web项目依赖-->
        <dependency>
            <groupId>org.springframework.boot</groupId>
            <artifactId>spring-boot-starter-web</artifactId>
        </dependency>
<!--        简化实体类,自动创建get set等方法-->
        <dependency>
            <groupId>org.projectlombok</groupId>
            <artifactId>lombok</artifactId>
            <optional>true</optional>
        </dependency>
<!--        测试相关-->
        <dependency>
            <groupId>org.springframework.boot</groupId>
            <artifactId>spring-boot-starter-test</artifactId>
            <scope>test</scope>
        </dependency>
<!--        mybatis依赖-->
        <dependency>
            <groupId>org.mybatis.spring.boot</groupId>
            <artifactId>mybatis-spring-boot-starter</artifactId>
            <version>2.2.2</version>
        </dependency>
<!--        mysql依赖-->
        <dependency>
            <groupId>mysql</groupId>
            <artifactId>mysql-connector-java</artifactId>
            <scope>runtime</scope>
        </dependency>
<!--        json数据处理-->
        <dependency>
            <groupId>com.alibaba</groupId>
            <artifactId>fastjson</artifactId>
            <version>1.2.15</version>
        </dependency>
<!--        分页助手 mybatis分页查询需要的依赖-->
        <dependency>
            <groupId>com.github.pagehelper</groupId>
            <artifactId>pagehelper-spring-boot-starter</artifactId>
            <version>1.2.13</version>
        </dependency>
    </dependencies>
2.配置文件
#项目端口
server.port=8899

#mysql数据库
spring.datasource.hikari.max-lifetime=120000
spring.datasource.url= jdbc:mysql://47.98.252.xxx:xxxx/atguigudb
spring.datasource.username=数据库用户名
spring.datasource.password=数据库密码
spring.datasource.driver-class-name=com.mysql.cj.jdbc.Driver
spring.datasource.hikari.max_lifetime=120000

#mysql字段驼峰命名 数据库中下划线的字段会被自动分隔变成大写字母
mybatis.configuration.map-underscore-to-camel-case=true
#指定xml文件路径
mybatis.mapper-locations=classpath:mapper/*.xml

#解析时间变为东8区
spring.jackson.time-zone=GMT+8
#时间格式
spring.jackson.date-format=yyyy-MM-dd HH:mm:ss

#打印sql
logging.level.com.lzp=debug

#pagehelper传递分页参数 根据参数自动分页
pagehelper.support-methods-arguments=true
3.创建欢迎页
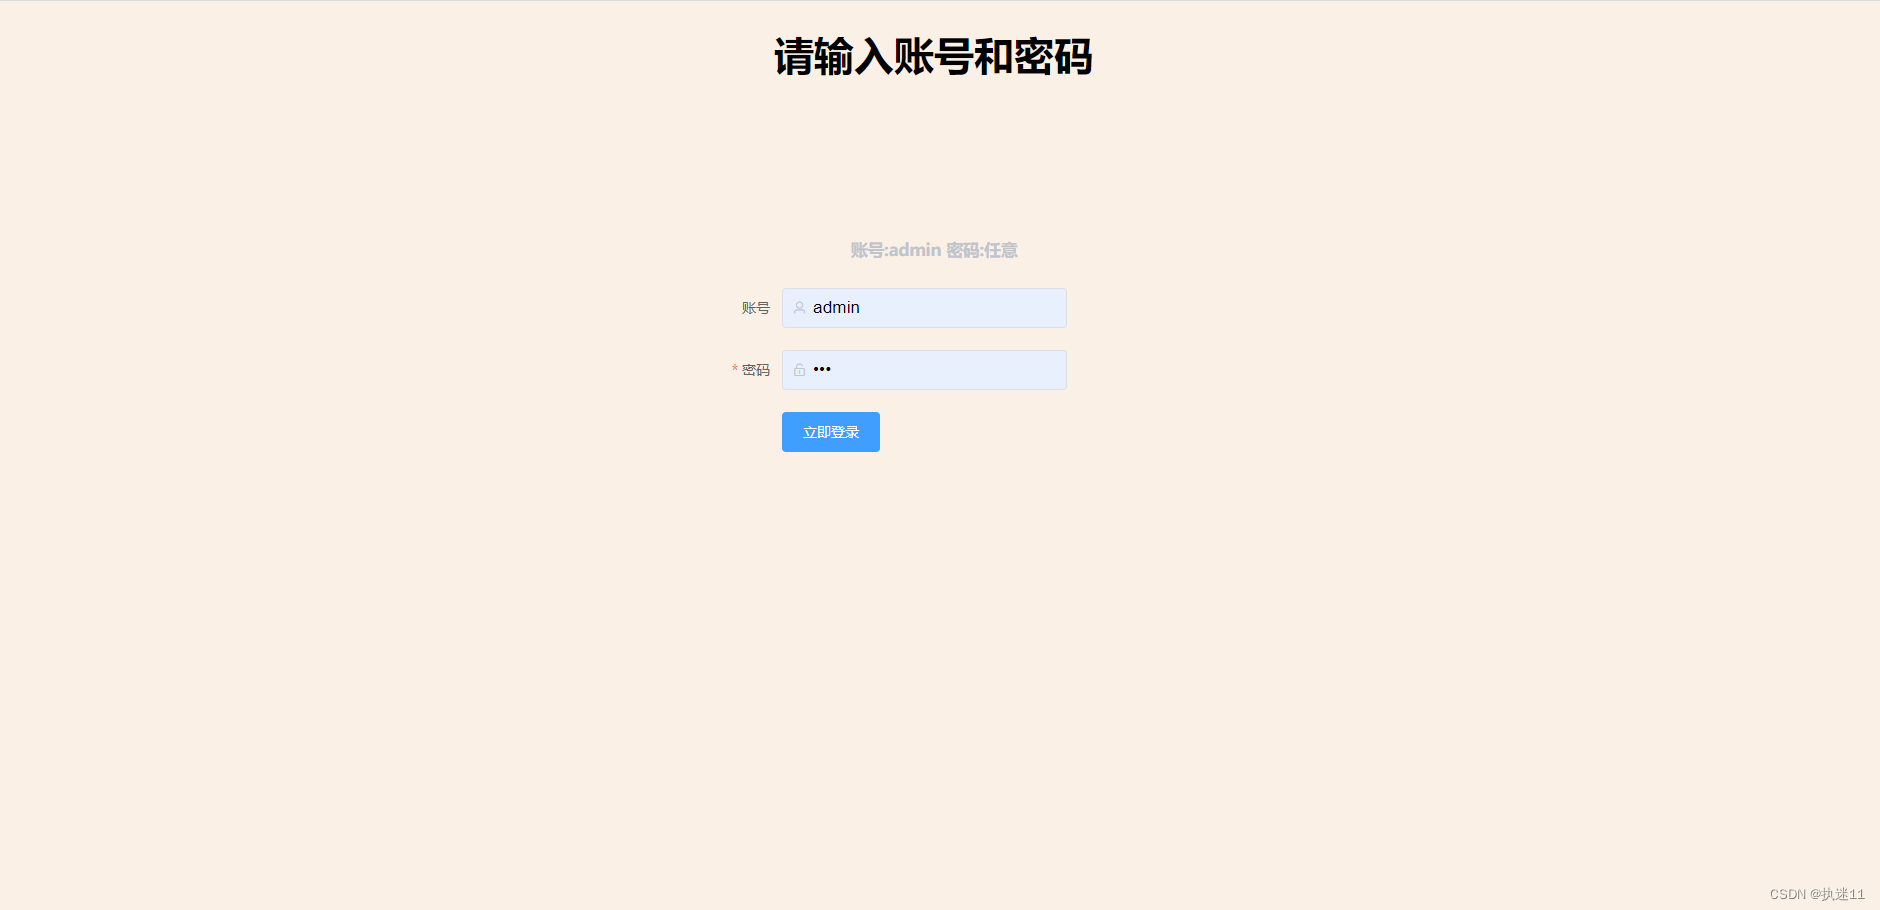
此工程欢迎页就是登录页
templates文件夹下index.html文件
页面代码:
<!DOCTYPE html>
<html lang="en">
<head>
<meta charset="UTF-8">
<title>login</title>
<script src="/vue/vue.js" rel="stylesheet" type="text/javascript"></script>
<script src="/element-ui/lib/index.js"></script>
<link rel="stylesheet" href="/element-ui/lib/theme-chalk/index.css">
<script src="/axios/axios.min.js"></script>
<script src="/vue-router/vue-router.min.js"></script>
</head>
<body style="background: linen">
<div id="test" >
<h1 align="center">请输入账号和密码</h1>
<br>
<br>
<br>
<br>
<!-- 登录-->
<h5 align="center" style="color: red">{{errorMsg}}</h5>
<el-form :model="ruleForm" :rules="rules" ref="ruleForm" label-width="800px"
class="demo-ruleForm" >
<h5 align="center" style="color: #C0C4CC">账号:admin 密码:任意</h5>
<el-form-item label="账号" prop="username">
<el-input style="width:285px;" v-model="ruleForm.username" prefix-icon="el-icon-user"
placeholder="请输入账号" clearable></el-input>
</el-form-item>
<el-form-item label="密码" prop="password">
<el-input style="width:285px;" v-model="ruleForm.password"
prefix-icon="el-icon-unlock" placeholder="请输入密码" show-password clearable></el-input>
</el-form-item>
<el-form-item>
<el-button type="primary" @click="submitForm('ruleForm')">立即登录</el-button>
</el-form-item>
</el-form>
</div>
<script>
//定义路由,登陆成功后进行页面跳转
let rt = new VueRouter({
mode: 'history',
routes: [{
path: "/item",
name: "ok",
}, {
path: "/reg",
}]
})
//创建vue实例
new Vue ({
el:"#test",
router: rt,
data: {
//错误信息
errorMsg:'',
//表单数据 账号和密码
ruleForm: {
username: '',
password:'',
},
//校验规则
rules: {
name: [
{ required: true, message: '请输入用户名', trigger: 'blur' },
{ min: 3, max: 5, message: '长度在 3 到 5 个字符', trigger: 'blur' }
],
password: [
{ required: true, message: '请输入密码', trigger: 'blur' },
{ min: 3, max: 5, message: '长度在 3 到 5 个字符', trigger: 'blur' }
],
}
},
//方法
methods: {
//提交账号密码
submitForm(formName) {
//执行数据校验
this.$refs[formName].validate((valid) => {
//校验通过发送请求 通过axios.post方法
if (valid) {
//发送请求,处理登录
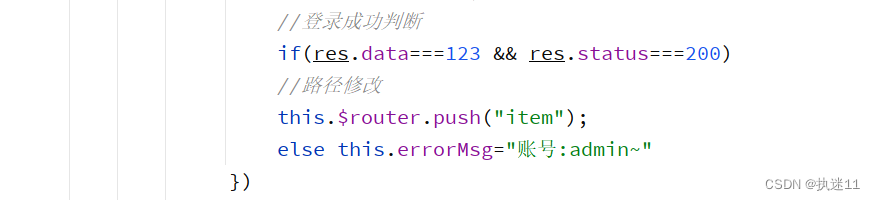
axios.post("/doLogin", this.ruleForm).then(res => {
console.log(res);
//登录成功判断
if(res.data===123 && res.status===200)
//路径修改
this.$router.push("item");
else this.errorMsg="账号:admin~"
})
// alert('submit!');
} else {
console.log('error submit!!');
return false;
}
});
}
},
//路径变了页面不跳转,路径变了强制刷新页面
watch: {
'$route' (to, from) {
this.$router.go(0);
}
},
})
</script>
</body>
</html>
页面效果:
4.处理登录请求
正常逻辑是去数据库根据用户名获取用户信息,然后进行密码匹配,匹配正确正常返回,异常返回异常信息。
这里处理逻辑很简单,判断传过来的username是不是admin,是的话返回123,不是的话返回0。
    @RequestMapping("/doLogin")
    @ResponseBody
    public String doLogin(@RequestBody User user){
        System.out.println(user);
        if(user.getUsername().equals("admin"))
        return "123";
        else return "0";
    }
5.登录成功进行页面跳转

设置路径为item,然后进行页面刷新,跳转到localhost:8899/item,展示employee信息
6.接收item请求
跳转到item.html页面
    @RequestMapping("/item")
    public String afterLogin(){
        return "item";
    }
7.item.html
展示员工信息
<!DOCTYPE html>
<html lang="en">
<head>
<meta charset="UTF-8">
<title>employees</title>
<script src="/vue/vue.js" rel="stylesheet" type="text/javascript"></script>
<script src="/element-ui/lib/index.js"></script>
<link rel="stylesheet" href="/element-ui/lib/theme-chalk/index.css">
<script src="/axios/axios.min.js"></script>
<script src="/vue-router/vue-router.min.js"></script>
</head>
<body>
<div id="item" class="item" >
<h3 align="right" >你好:{{username}}</h3>
<h3 style="color: #a0cfff;" align="left" >
员工信息展示
</h3>
<div>
入职日期:
<div class="block" style="display: inline-block">
<el-date-picker
style="width: 195px"
value-format="yyyy-MM-dd"
v-model="search.searchDate"
type="date"
placeholder="请选择入职日期起点">
</el-date-picker>
<el-date-picker
style="width: 195px"
value-format="yyyy-MM-dd"
v-model="search.searchDateEnd"
type="date"
placeholder="请选择入职日期终点">
</el-date-picker>
</div>
姓名:
<el-input
style="width: 185px"
placeholder="请输入部分姓名"
prefix-icon="el-icon-search"
v-model="search.searchName">
</el-input>
<el-button type="primary" round @click="getEmployees()" icon="el-icon-search">
条件搜索
</el-button>
<el-button type="primary" round @click="getDepartments()" icon="el-icon-menu">
部门总览
</el-button>
</div>
<template


