文章目录
- 前言
- 1. 调试工具
- 1.1webpack-bundle-analyzer
- 1.2 Network面板
- 1.3 lighthouse面板
- 1.4 performance面板
- 2 优化手段
- 2.1减少HTTP请求
- 2.2 减少资源体积
- 2.3 其他
- 写在最后
前言
最近项目功能开发基本完成,处于一个稳定版本,现阶段进入一个性能优化阶段。前端自然也进行了一定的性能优化,在这里记录一下。
1. 调试工具
要进行性能优化,第一步要先了解有哪些性能调试工具,排查拉低性能的问题,才能针对性的去做优化
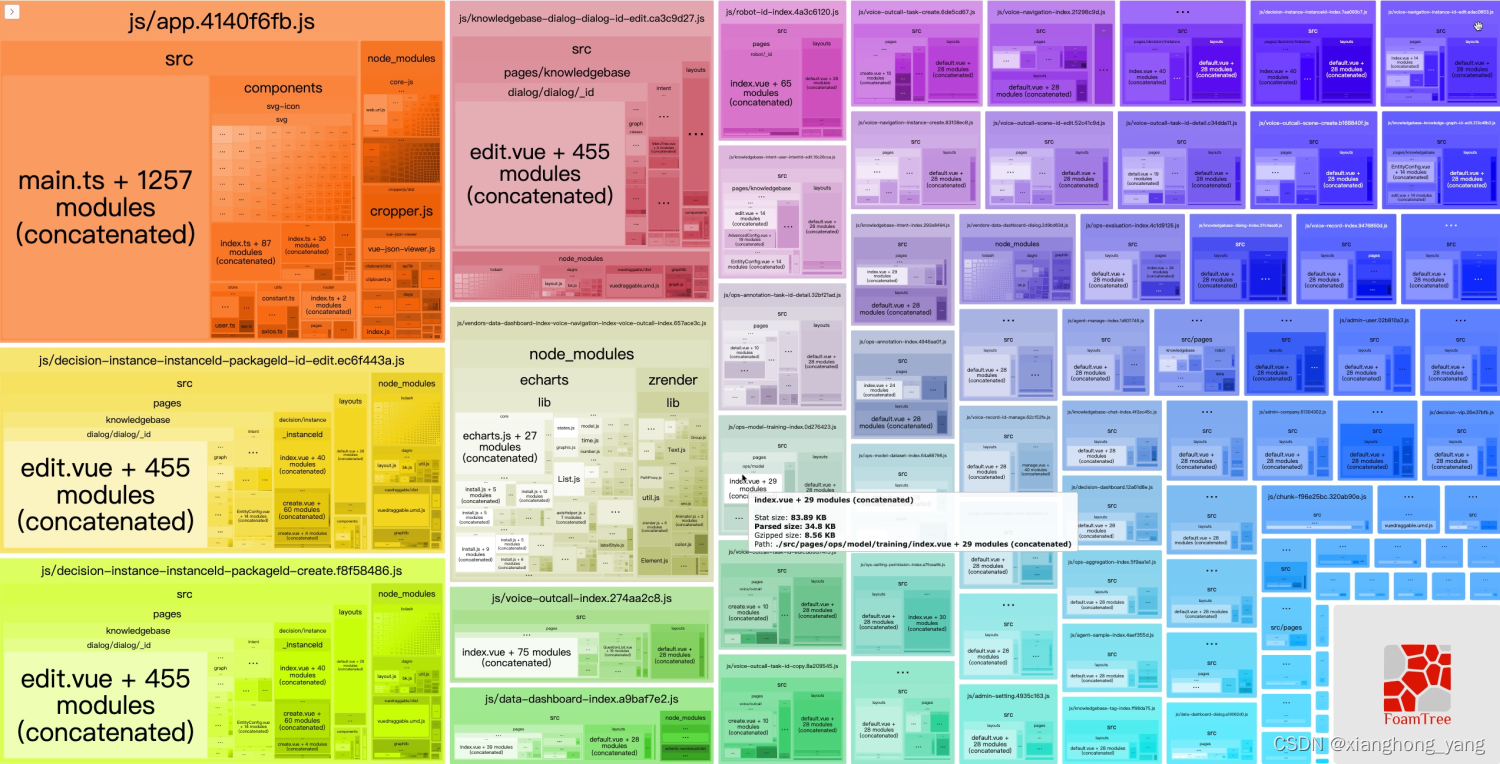
1.1webpack-bundle-analyzer
如果项目基于webpack构建,可使用其可视化分析工具插件webpack-bundle-analyzer。因为vue-cli已内置集成该插件,所以直接使用 npm run build -- --report在构建完成后/dist 目录内新增 report.html 报告文件。
1.2 Network面板
Network面板记录了与服务器交互的具体细节。
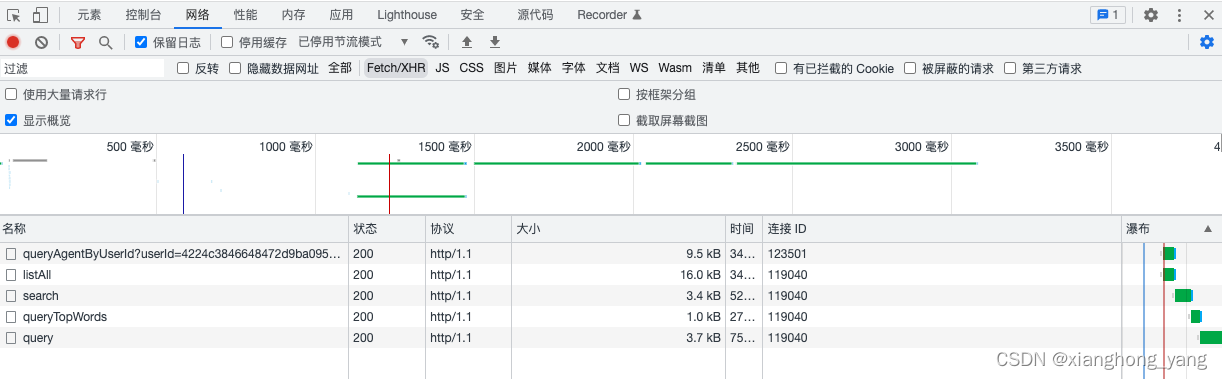
在这里我们可以看到发起的请求数量,传输体积以及解压缩后的体积,同时还可以知道哪些资源是命中了强缓存,哪些资源命中的协商缓,资源从服务器到达我们的电脑所花的时间。

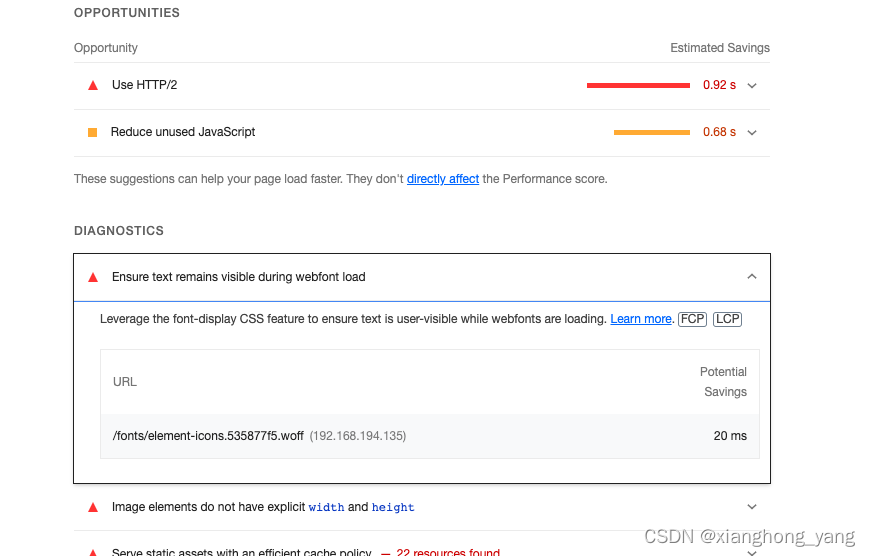
1.3 lighthouse面板

lighthouse是对网站整体的评估,通过几个不同的指标给网站进行打分。First Contentful Paint 首屏渲染时间,Chrome会取第一个渲染出来的元素作为时间参考。Time to Interactive 可交互时间,从能看到能摸的时间点。Speed Index速度指数,页面的填充速度。Total Blocking Time从能看到能摸之间超过50ms的任务总和。Largest Contentful Paint页面中最大的那块渲染的时间点。Cumulative Layout Shift元素移动所累积的时间点,比如有一个absolute的元素突然从左边移到了右边。同时针对网站的信息,lighthouse还会给出一些完善建议:
1.4 performance面板
暂时没有用到,后续补充
2 优化手段
2.1减少HTTP请求
- 合并CSS
configureWebpack(config) {
  if (isProduction) {
    config.optimization.splitChunks.cacheGroups.styles = {
        name: "styles",
        test: (m) => m.constructor.name === "CssModule",
        chunks: "all",
        minChunks: 1,
        enforce: true,
      };
  }
},
- 封装
svg-icon组件,合并打包,减少文件请求
// vue.config.js
  chainWebpack(config) {
    // 配置svg
    config.module
      .rule("svg")
      .exclude.add(resolve(__dirname, "./src/components/svg-icon/svg"))
      .end();
    config.module
      .rule("icons")
      .test(/.svg$/)
      .include.add(resolve(__dirname, "./src/components/svg-icon/svg"))
      .end()
      .use("svg-sprite-loader")
      .loader("svg-sprite-loader")
      .options({
        symbolId: "icon-[name]",
      })
      .end();
  },
2.2 减少资源体积
- 提取第三方 js 库
configureWebpack(config) {
    if (isProduction) {
      config.externals = {
        "vue-router": "VueRouter",
        "element-ui": "ELEMENT",
        "@antv/x6": "X6",
        "@antv/layout": "layout",
        "@vue/composition-api": "VueCompositionAPI",
        sortablejs: "Sortable",
        vue: "Vue",
        vuex: "Vuex",
        axios: "axios",
        echarts: "echarts",
        jquery: "$",
        lodash: "_",
        quill: "Quill",
      };

...

chainWebpack(config) {
  if (isProduction) {
    config.plugin("html").tap((args) => {
      args[0].cdn = {
        js: [
          "/assets/js/vue.min.js",
          "/assets/js/composition-api.js",
          "/assets/js/vue-router.min.js",
          "/assets/js/vuex.min.js",
          "/assets/js/axios.min.js",
          "/assets/js/x6.js",
          "/assets/js/layout.min.js",
          "/assets/js/lodash.min.js",
          "/assets/js/jquery.min.js",
          "/assets/js/element-ui.js",
          "/assets/js/echarts.min.js",
          "/assets/js/quill.min.js",
          "/assets/js/sortable.min.js",
        ],
      };
      return args;
    });
- 图片压缩
推荐工具:在线图片压缩,一般能将图片压缩到原图片体积的20%到40%,而且图片清晰度还不错。 - gzip压缩
项目中采用构建时打包生成 .gz 文件,而不是访问文件时 nginx 服务器实时压缩,减轻服务器压力。
// vue.config.js
const CompressionWebpackPlugin = require("compression-webpack-plugin");
module.exports = {
  chainWebpack(config) {
    if (isProduction) {
      // 合并压缩js文件
      config.plugin("CompressionWebpackPlugin").use(CompressionWebpackPlugin, [{
        filename: "[path].gz[query]",
        algorithm: "gzip",
        test: /.js$|.json$|.css/,
        threshold: 10240, // 只有大小大于10kb资源会被处理
        minRatio: 0.8, // 只有压缩率小于0.8的资源才会被处理
        deleteOriginalAssets: false, // 删除原文件
      }]);
    }
  }
}
// /nginx/conf/nginx.conf
# [root ~]# nginx -V
# configure arguments: --with-http_gzip_static_module

http {
  server {
    gzip on;
    gzip_static on; # js和css等静态资源有.gz压缩文件,优先使用压缩文件

    # gzip_buffers 32 4k;
    # gzip_comp_level 6;
    # gzip_min_length 100;
    # gzip_types application/javascript
    # text/javascript text/css text/xml;
    # gzip_disable "MSIE [1-6].";
    # #配置禁用gzip条件, 支持正则. 此处表示ie6及以下不启用gzip( 因为ie低版本不支持)
    # gzip_vary on;
    ...
  }
}
- 缓存 header
// /nginx/conf/nginx.conf
# 静态资源文件采用强缓存
location ~* .(css|js|png|jpg|jpeg|gif|gz|svg|mp4|ogg|ogv|webm|htc|xml|woff)$ {
  root /home/work/dfx/web/dist;
  try_files $uri $uri/ /index.html;
  index index.html index.htm;
  access_log off;
  add_header    Cache-Control  max-age=86400;
}

# html文件采用协商缓存
location / {
  root /home/work/dfx/web/dist;
  try_files $uri $uri/ /index.html;
  index index.html index.htm;
  access_log off;
  add_header  Cache-Control  max-age=no-cache;
}
- 移除
console/注释等冗余代码
chainWebpack(config) {
    if (isProduction) {
      // 删除注释 https://www.cnblogs.com/gengzhen/p/15251600.html
      // index.html中的console.log不会被去除
      config.optimization.minimizer("terser").tap((args) => {
        args[0].terserOptions.compress.drop_console = true;
        args[0].terserOptions.compress.drop_debugger = true;
        args[0].terserOptions.compress.pure_funcs = ["console.log"];
        args[0].terserOptions.output = {
          comments: false,
        };
        return args;
      });
  },
}
2.3 其他
- prefetch 和 preload
合理使用prefetch和preload - 使用 HTTP/2
相比HTTP/1.1的优势
● 连接复用:在用户和网站之间只用一个连接,避免后续建立连接过程中的几个往返和慢启动,同时减少了服务器的资源消耗
● 没有线头阻塞:采用新的二进制分帧层的机制,组成消息的帧可以乱序发送,帧到达对端重新组装,不需要等待前面的帧到达后再发送
● 报头压缩:HTTP/2协议中采用HPACK来压缩请求头和响应头,降低协议开销
● 更加安全:当前主流浏览器,都只支持基于 HTTPS 部署的 HTTP/2
nginx 配置
# [root ~]# nginx -V
# configure arguments: --with-http_ssl_module --with-http_v2_module

http {
  server {
    listen 443 ssl http2;

    ssl_certificate      ssl/selfsigned.crt;
    ssl_certificate_key  ssl/selfsigned.key;
    ssl_session_cache    shared:SSL:1m;
    ssl_session_timeout  5m;

    ssl_ciphers  HIGH:!aNULL:!MD5;
    ssl_prefer_server_ciphers  on;
    ...
  }
}
写在最后
以上仅为在项目中使用的优化手段,前端优化道路很漫长,一篇比较全面的优化指南,推荐给你


