使用MediaPipe工具包进行开发
什么是MediaPipe?
MediaPipe是一款由Google Research 开发并开源的多媒体机器学习模型应用框架,用于处理视频、音频等时间序列数据。这个跨平台架构使用于桌面/服务器、Android、iOS和嵌入式设备等。
我们使用MeidaPipe下的Solutions(方案特定的模型),共有16个Solutions:
- 人脸检测
- Fase Mesh (人脸上打了特别多网格)
- 虹膜(人眼)
- 手
- 姿态(!这章博客需要用到的)
- 人体
- 人物分割
- 头发分割
- 目标检测
- Box Tracking
- 实例动态跟踪
- 3D目标检测
- 特征匹配
- AutoFlip
- MediaSequence
- YouTube-8M
人体姿态估计代码
重点代码讲解
1.solutions.pose
import mediapipe as mp
mp_pose = mp.solutions.pose
mediapipe姿态估计模块(.solutions.pose),将人体各个部位分成33个点(0-32)如下图1.
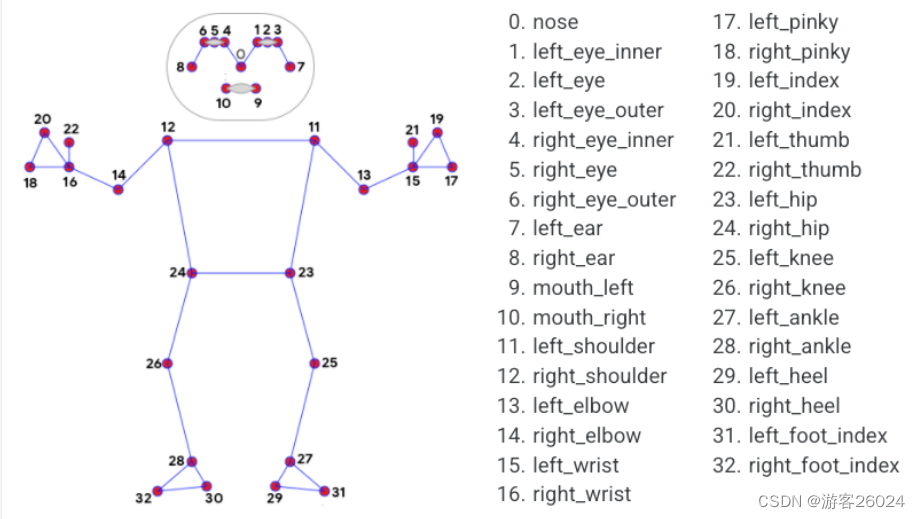
图1.
通常可以通过判断角度,来判断姿态是什么动作。如下图2. (具体动作识别判断:采集不同动作下的图片,然后通过姿态检测,根据角度对图像进行标注,将大量图像作为训练集进行学习,完成姿态行为识别判断。)
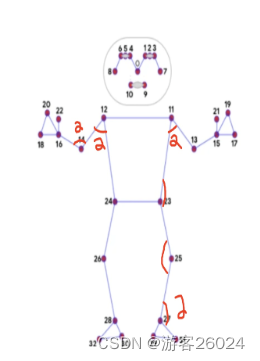
图2.
2.mp_pose.Pose()其参数:
static_image_mode 表示 静态图像还是连续帧视频
model_complexity 表示 人体姿态估计模型; 0 表示 速度最快,精度最低(三者之中);1 表示 速度中间,精度中间(三者之中);2 表示 速度最慢,精度最高(三者之中);
smooth_landmarks 表示 是否平滑关键点;
enable_segmentation 表示 是否对人体进行抠图;
min_detection_confidence 表示 检测置信度阈值;
min_tracking_confidence 表示 各帧之间跟踪置信度阈值;
 pose = mp_pose.Pose(static_image_mode=True,
                        model_complexity=1,
                        smooth_landmarks=True,
                        enable_segmentation=True,
                        min_detection_confidence=0.5,
                        min_tracking_confidence=0.5)
3.solutions.drawing_utils
绘图(可以绘制3D坐标,也可以直接在原图上绘制关键点,姿态)
drawing = mp.solutions.drawing_utils
...
drawing.draw_landmarks(img, results.pose_landmarks, mp_pose.POSE_CONNECTIONS)(原图基础上显示关键点,姿态)
drawing.plot_landmarks(results.pose_world_landmarks, mp_pose.POSE_CONNECTIONS)(3D)
之后的代码就是opencv相关
完整代码
import cv2
import mediapipe as mp

if __name__ == '__main__':
    mp_pose = mp.solutions.pose
    pose = mp_pose.Pose(static_image_mode=True,
                        model_complexity=1,
                        smooth_landmarks=True,
                        # enable_segmentation=True,
                        min_detection_confidence=0.5,
                        min_tracking_confidence=0.5)
    drawing = mp.solutions.drawing_utils

    # read img BGR to RGB
    img = cv2.imread("1.jpg")
    img = cv2.cvtColor(img, cv2.COLOR_BGR2RGB)
    cv2.imshow("input", img)

    results = pose.process(img)
    drawing.draw_landmarks(img, results.pose_landmarks, mp_pose.POSE_CONNECTIONS)
    cv2.imshow("keypoint", img)

    drawing.plot_landmarks(results.pose_world_landmarks, mp_pose.POSE_CONNECTIONS)

    cv2.waitKey(0)
    cv2.destroyAllWindows()
运行结果
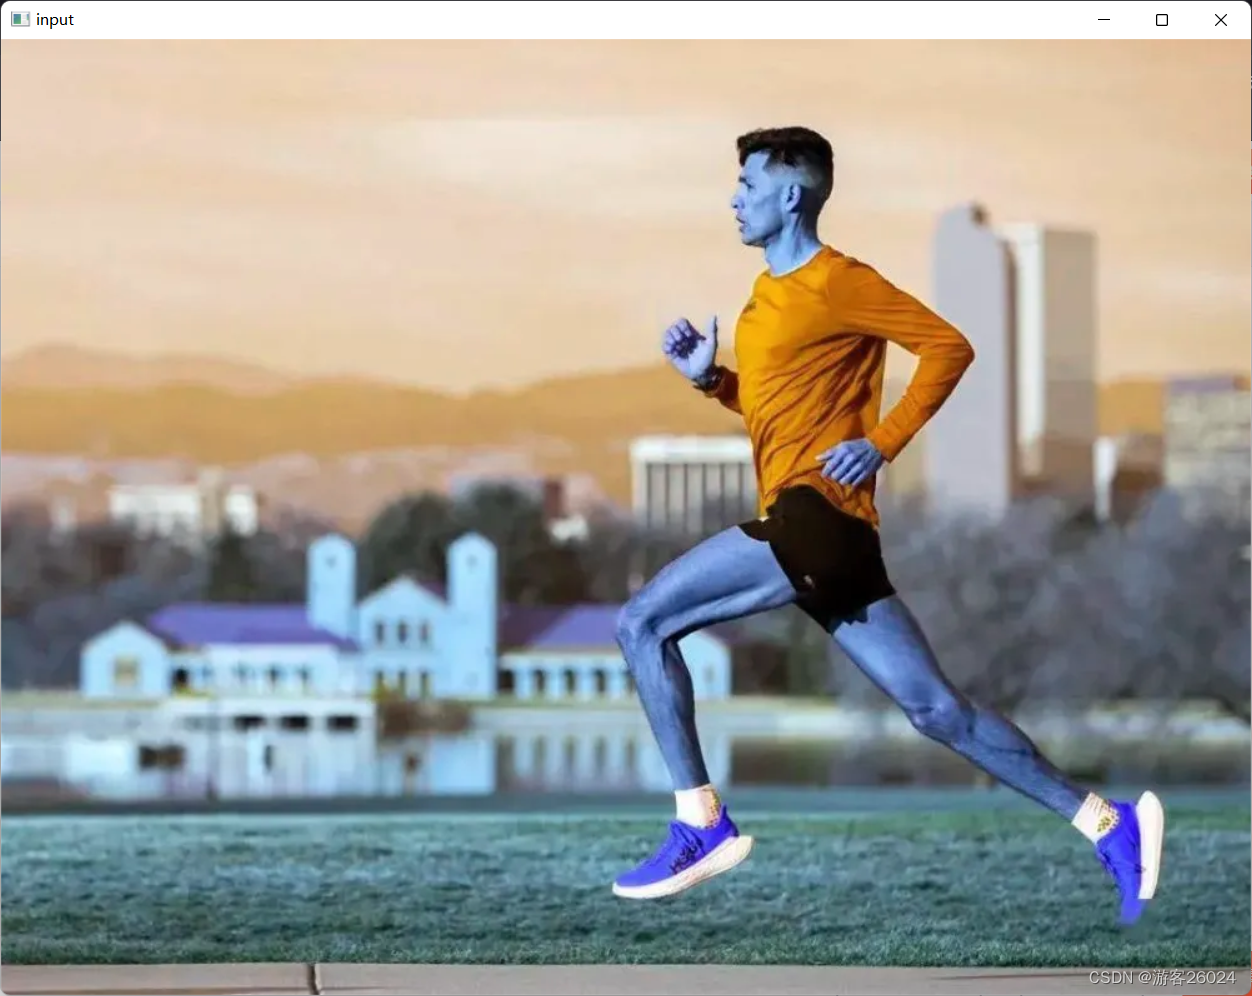
原图
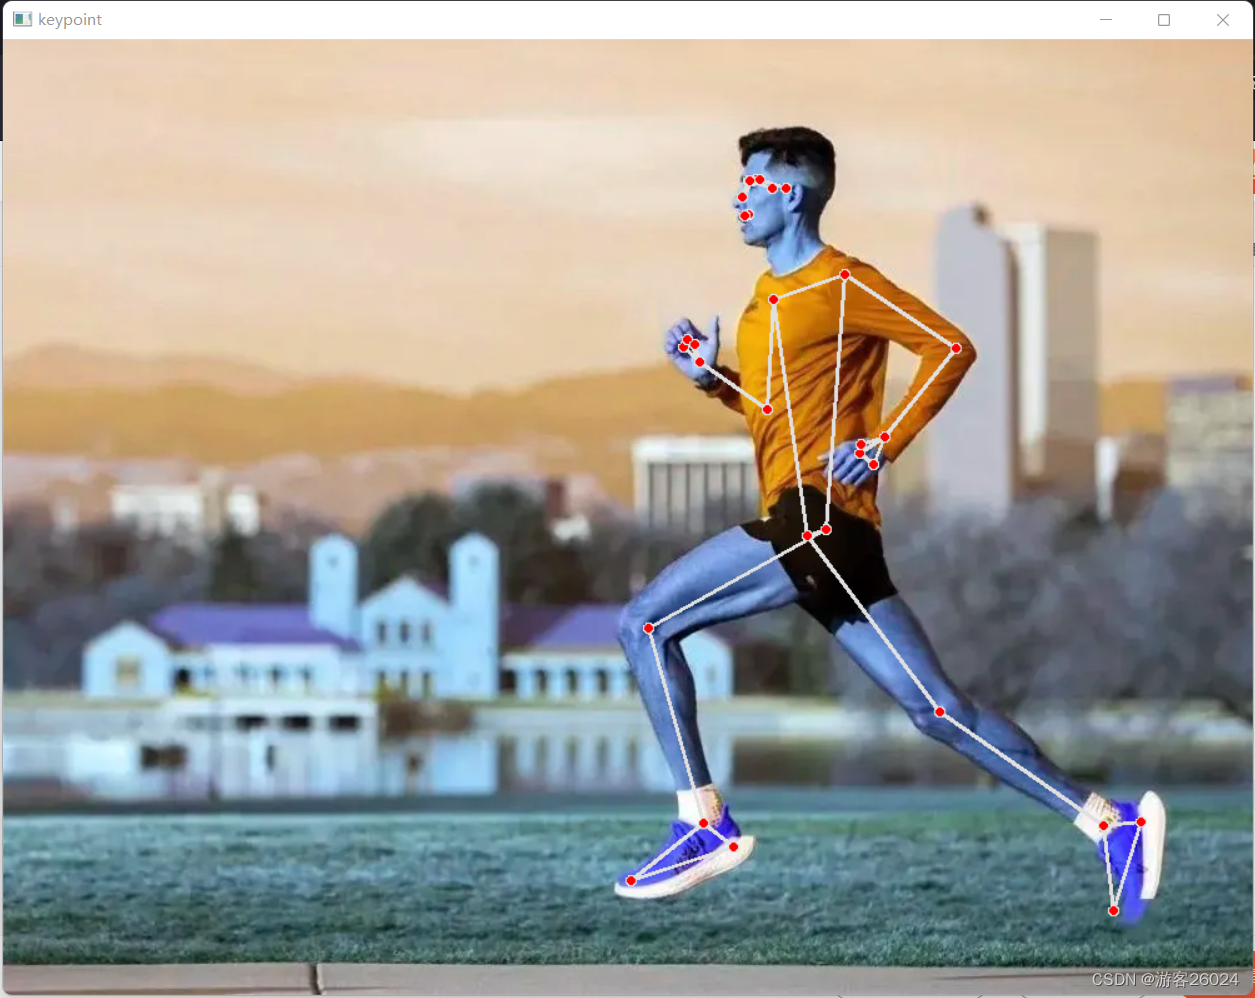
原图基础上显示关键点
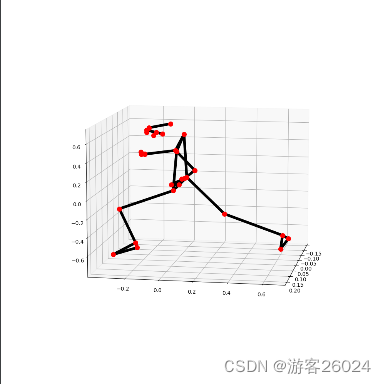
3D坐标
坐标解析
还是拿这个正在跑步的人举例。
代码
import cv2
import mediapipe as mp
import matplotlib.pyplot as plt

mp_pose = mp.solutions.pose

pose = mp_pose.Pose(static_image_mode=False,
                    model_complexity=0,
                    smooth_landmarks=True,
                    enable_segmentation=True,
                    min_detection_confidence=0.5,
                    min_tracking_confidence=0.5)
drawing = mp.solutions.drawing_utils

if __name__ == '__main__':
    img = cv2.imread('1.jpg')
    results = pose.process(img)
    print(results.pose_landmarks)
# results.pose_landmarks其中 所有关键点的检测结果可以从 results.pose_landmarks 看到如下;这是归一化之后的结果,若要还原,x得乘以宽度得到像素坐标;y得乘以高度得到像素坐标;z坐标的原点在人体左右两个髋关节的中点,方向如果离越近为负值,越远为正值。
landmark {
  x: 0.5913416743278503
  y: 0.17020824551582336
  z: -0.10148811340332031
  visibility: 0.9999819993972778
}
landmark {
  x: 0.5996149778366089
  y: 0.15227100253105164
  z: -0.11516246944665909
  visibility: 0.9999804496765137
}
landmark {
  x: 0.6029789447784424
  y: 0.15230441093444824
  z: -0.1152396947145462
  visibility: 0.9999819993972778
}
landmark {
  x: 0.6068712472915649
  y: 0.15244033932685852
  z: -0.11535673588514328
  visibility: 0.9999862909317017
}
landmark {
  x: 0.5956720113754272
  y: 0.15167823433876038
  z: -0.07190258055925369
  visibility: 0.9999619722366333
}
landmark {
  x: 0.5958214998245239
  y: 0.1511225700378418
  z: -0.07187224179506302
  visibility: 0.9999505281448364
}
landmark {
  x: 0.5961448550224304
  y: 0.15046393871307373
  z: -0.07175181061029434
  visibility: 0.9999566078186035
}
landmark {
  x: 0.6275932788848877
  y: 0.16257867217063904
  z: -0.12434940785169601
  visibility: 0.9999855756759644
}
landmark {
  x: 0.612525463104248
  y: 0.15917572379112244
  z: 0.07216572016477585
  visibility: 0.9999306201934814
}
landmark {
  x: 0.5972875952720642
  y: 0.1862889975309372
  z: -0.10227096825838089
  visibility: 0.9999692440032959
}
landmark {
  x: 0.592987596988678
  y: 0.18590152263641357
  z: -0.04587363451719284
  visibility: 0.9999159574508667
}
landmark {
  x: 0.6709297895431519
  y: 0.25625985860824585
  z: -0.19476133584976196
  visibility: 0.9999887943267822
}
landmark {
  x: 0.6155267357826233
  y: 0.27312740683555603
  z: 0.23764272034168243
  visibility: 0.9998886585235596
}
landmark {
  x: 0.76192706823349
  y: 0.32696548104286194
  z: -0.23866404592990875
  visibility: 0.9991742968559265
}
landmark {
  x: 0.6149069666862488
  y: 0.37373778223991394
  z: 0.3292929530143738
  visibility: 0.2991478443145752
}
landmark {
  x: 0.7010799646377563
  y: 0.4162237048149109
  z: -0.18799468874931335
  visibility: 0.9904139637947083
}
landmark {
  x: 0.5629619359970093
  y: 0.34696149826049805
  z: 0.2674705684185028
  visibility: 0.40632331371307373
}
landmark {
  x: 0.6892314553260803
  y: 0.43785160779953003
  z: -0.21043820679187775
  visibility: 0.9691246151924133
}
landmark {
  x: 0.5501535534858704
  y: 0.334354966878891
  z: 0.26719772815704346
  visibility: 0.36899450421333313
}
landmark {
  x: 0.6795801520347595
  y: 0.4296255111694336
  z: -0.19730502367019653
  visibility: 0.9676418304443359
}
landmark {
  x: 0.5508479475975037
  y: 0.3242868185043335
  z: 0.23829618096351624
  visibility: 0.37453970313072205
}
landmark {
  x: 0.6808692216873169
  y: 0.4231947660446167
  z: -0.17752741277217865
  visibility: 0.9631088972091675
}
landmark {
  x: 0.555029034614563
  y: 0.3278791904449463
  z: 0.2512615919113159
  visibility: 0.3893350064754486
}
landmark {
  x: 0.6576938033103943
  y: 0.5196953415870667
  z: -0.14214162528514862
  visibility: 0.9999549388885498
}
landmark {
  x: 0.6405556797981262
  y: 0.5202372074127197
  z: 0.14222070574760437
  visibility: 0.9999477863311768
}
landmark {
  x: 0.5241203904151917
  y: 0.6201881766319275
  z: -0.15834815800189972
  visibility: 0.9693808555603027
}
landmark {
  x: 0.7318142056465149
  y: 0.6902449727058411
  z: 0.11025446653366089
  visibility: 0.9495575428009033
}
landmark {
  x: 0.5604070425033569
  y: 0.815612256526947
  z: -0.03564663231372833
  visibility: 0.9501809477806091
}
landmark {
  x: 0.8767399191856384
  y: 0.8223288655281067
  z: 0.1430264711380005
  visibility: 0.9820705652236938
}
landmark {
  x: 0.5801612138748169
  y: 0.8386951684951782
  z: -0.026119956746697426
  visibility: 0.9103515148162842
}
landmark {
  x: 0.8959819078445435
  y: 0.875182569026947
  z: 0.14569874107837677
  visibility: 0.9787982106208801
}
landmark {
  x: 0.5071742534637451
  y: 0.875374436378479
  z: -0.06918345391750336
  visibility: 0.9140819907188416
}
landmark {
  x: 0.88722825050354
  y: 0.9008339643478394
  z: 0.09929685294628143
  visibility: 0.9545168280601501
}
调用
print(mp_pose.POSE_CONNECTIONS)

# mp_pose.POSE_CONNECTIONS
mp_pose.POSE_CONNECTIONS表示人体33个关键点如何连接的骨架
frozenset({(15, 21),
           (16, 20),
           (18, 20),
           (3, 7),
           (14, 16),
           (23, 25),
           (28, 30),
           (11, 23),
           (27, 31),
           (6, 8),
           (15, 17),
           (24, 26),
           (16, 22),
           (4, 5),
           (5, 6),
           (29, 31),
           (12, 24),
           (23, 24),
           (0, 1),
           (9, 10),
           (1, 2),
           (0, 4),
           (11, 13),
           (30, 32),
           (28, 32),
           (15, 19),
           (16, 18),
           (25, 27),
           (26, 28),
           (12, 14),
           (17, 19),
           (2, 3),
           (11, 12),
           (27, 29),
           (13, 15)})
调用
print(results.pose_landmarks.landmark[mp_pose.PoseLandmark.LEFT_EYE])
print(results.pose_landmarks.landmark[2])

# results.pose_landmarks.landmark[mp_pose.PoseLandmark.LEFT_EYE]
# or
# results.pose_landmarks.landmark[2]
查看左眼属性
x: 0.6029789447784424
y: 0.15230441093444824
z: -0.1152396947145462
visibility: 0.9999819993972778
调用左眼的x轴
print(results.pose_landmarks.landmark[2].x)

# results.pose_landmarks.landmark[2].x
查看左眼的x轴
0.6029789447784424还原左眼像素
    height, width, channels = img.shape
    print("x:{},y:{}".format(results.pose_landmarks.landmark[2].x * width,
                             results.pose_landmarks.landmark[2].y * height))

#(results.pose_landmarks.landmark[2].x * width,results.pose_landmarks.landmark[2].y * height)
查看左眼像素
x:602.9789447784424,y:116.5128743648529获取左眼真实坐标 (真实坐标位于人体左右两个髋关节的中点)
print(results.pose_world_landmarks.landmark[2])

# results.pose_world_landmarks.landmark[2]
查看
x: -0.1573336124420166
y: -0.6765229105949402
z: -0.09651455283164978
visibility: 0.9999819993972778
交互式三维可视化
核心思想都是将谷歌的pose_landmarks.landmark坐标提取出来,处理成python的列表数据格式
有两种方式获取三维坐标,可以测得每种方式的FPS
1.map
import time

import cv2
import numpy as np
import mediapipe as mp

mp_pose = mp.solutions.pose

pose = mp_pose.Pose(static_image_mode=False,
                    model_complexity=0,
                    smooth_landmarks=True,
                    enable_segmentation=True,
                    min_detection_confidence=0.5,
                    min_tracking_confidence=0.5)
drawing = mp.solutions.drawing_utils

# 提取x,y,z坐标
def get_x(each):
    return each.x

def get_y(each):
    return each.y

def get_z(each):
    return each.z


if __name__ == '__main__':
    t0 = time.time()
    img = cv2.imread('1.jpg')
    img = cv2.cvtColor(img, cv2.COLOR_BGR2RGB)
    results = pose.process(img)
    drawing.draw_landmarks(img, results.pose_landmarks, mp_pose.POSE_CONNECTIONS)
    coords = np.array(results.pose_landmarks.landmark)

    x = np.array(list(map(get_x, coords)))
    y = np.array(list(map(get_y, coords)))
    z = np.array(list(map(get_z, coords)))

    point = np.vstack((x, y, z)).T
    print("FPS: {}".format(str(int(1 / (time.time() - t0)))))
    print(point)
运行结果
FPS: 4
[[ 0.59134167  0.17020825 -0.10148811]
 [ 0.59961498  0.152271   -0.11516247]
 [ 0.60297894  0.15230441 -0.11523969]
 [ 0.60687125  0.15244034 -0.11535674]
 [ 0.59567201  0.15167823 -0.07190258]
 [ 0.5958215   0.15112257 -0.07187224]
 [ 0.59614486  0.15046394 -0.07175181]
 [ 0.62759328  0.16257867 -0.12434941]
 [ 0.61252546  0.15917572  0.07216572]
 [ 0.5972876   0.186289   -0.10227097]
 [ 0.5929876   0.18590152 -0.04587363]
 [ 0.67092979  0.25625986 -0.19476134]
 [ 0.61552674  0.27312741  0.23764272]
 [ 0.76192707  0.32696548 -0.23866405]
 [ 0.61490697  0.37373778  0.32929295]
 [ 0.70107996  0.4162237  -0.18799469]
 [ 0.56296194  0.3469615   0.26747057]
 [ 0.68923146  0.43785161 -0.21043821]
 [ 0.55015355  0.33435497  0.26719773]
 [ 0.67958015  0.42962551 -0.19730502]
 [ 0.55084795  0.32428682  0.23829618]
 [ 0.68086922  0.42319477 -0.17752741]
 [ 0.55502903  0.32787919  0.25126159]
 [ 0.6576938   0.51969534 -0.14214163]
 [ 0.64055568  0.52023721  0.14222071]
 [ 0.52412039  0.62018818 -0.15834816]
 [ 0.73181421  0.69024497  0.11025447]
 [ 0.56040704  0.81561226 -0.03564663]
 [ 0.87673992  0.82232887  0.14302647]
 [ 0.58016121  0.83869517 -0.02611996]
 [ 0.89598191  0.87518257  0.14569874]
 [ 0.50717425  0.87537444 -0.06918345]
 [ 0.88722825  0.90083396  0.09929685]]

Process finished with exit code 0
2.for
import time

import cv2
import numpy as np
import mediapipe as mp

mp_pose = mp.solutions.pose

pose = mp_pose.Pose(static_image_mode=False,
                    model_complexity=0,
                    smooth_landmarks=True,
                    enable_segmentation=True,
                    min_detection_confidence=0.5,
                    min_tracking_confidence=0.5)
drawing = mp.solutions.drawing_utils

point_x = []
point_y = []
point_z = []


# 提取x,y,z坐标
def get_x_y_z(each):
    point_x.append(each.x)
    point_y.append(each.y)
    point_z.append(each.z)
    return point_x, point_y, point_z


if __name__ == '__main__':
    t0 = time.time()
    img = cv2.imread('1.jpg')
    img = cv2.cvtColor(img, cv2.COLOR_BGR2RGB)
    results = pose.process(img)
    drawing.draw_landmarks(img, results.pose_landmarks, mp_pose.POSE_CONNECTIONS)
    coords = np.array(results.pose_landmarks.landmark)

    for index, each in enumerate(coords):
        x, y, z = get_x_y_z(each)
    point = np.vstack((x, y, z)).T
    print("FPS: {}".format(str(int(1 / (time.time() - t0)))))
    print(point)
运行结果
FPS: 4
[[ 0.59134167  0.17020825 -0.10148811]
 [ 0.59961498  0.152271   -0.11516247]
 [ 0.60297894  0.15230441 -0.11523969]
 [ 0.60687125  0.15244034 -0.11535674]
 [ 0.59567201  0.15167823 -0.07190258]
 [ 0.5958215   0.15112257 -0.07187224]
 [ 0.59614486  0.15046394 -0.07175181]
 [ 0.62759328  0.16257867 -0.12434941]
 [ 0.61252546  0.15917572  0.07216572]
 [ 0.5972876   0.186289   -0.10227097]
 [ 0.5929876   0.18590152 -0.04587363]
 [ 0.67092979  0.25625986 -0.19476134]
 [ 0.61552674  0.27312741  0.23764272]
 [ 0.76192707  0.32696548 -0.23866405]
 [ 0.61490697  0.37373778  0.32929295]
 [ 0.70107996  0.4162237  -0.18799469]
 [ 0.56296194  0.3469615   0.26747057]
 [ 0.68923146  0.43785161 -0.21043821]
 [ 0.55015355  0.33435497  0.26719773]
 [ 0.67958015  0.42962551 -0.19730502]
 [ 0.55084795  0.32428682  0.23829618]
 [ 0.68086922  0.42319477 -0.17752741]
 [ 0.55502903  0.32787919  0.25126159]
 [ 0.6576938   0.51969534 -0.14214163]
 [ 0.64055568  0.52023721  0.14222071]
 [ 0.52412039  0.62018818 -0.15834816]
 [ 0.73181421  0.69024497  0.11025447]
 [ 0.56040704  0.81561226 -0.03564663]
 [ 0.87673992  0.82232887  0.14302647]
 [ 0.58016121  0.83869517 -0.02611996]
 [ 0.89598191  0.87518257  0.14569874]
 [ 0.50717425  0.87537444 -0.06918345]
 [ 0.88722825  0.90083396  0.09929685]]

Process finished with exit code 0
FPS都差不多
之后显示成三维
import cv2
import time
import numpy as np
import open3d
import mediapipe as mp

mp_pose = mp.solutions.pose

pose = mp_pose.Pose(static_image_mode=False,
                    model_complexity=0,
                    smooth_landmarks=True,
                    enable_segmentation=True,
                    min_detection_confidence=0.5,
                    min_tracking_confidence=0.5)
drawing = mp.solutions.drawing_utils

point_x = []
point_y = []
point_z = []


# 提取x,y,z坐标
def get_x_y_z(each):
    point_x.append(each.x)
    point_y.append(each.y)
    point_z.append(each.z)
    return point_x, point_y, point_z


if __name__ == '__main__':
    img = cv2.imread('1.jpg')
    img = cv2.cvtColor(img, cv2.COLOR_BGR2RGB)
    results = pose.process(img)
    drawing.draw_landmarks(img, results.pose_landmarks, mp_pose.POSE_CONNECTIONS)
    coords = np.array(results.pose_landmarks.landmark)

    for index, each in enumerate(coords):
        x, y, z = get_x_y_z(each)
    point = np.vstack((x, y, z)).T
    # 3d点云 3维可视化
    point_cloud = open3d.geometry.PointCloud()
    points = open3d.utility.Vector3dVector(point)
    point_cloud.points = points
    open3d.visualization.draw_geometries([point_cloud])
运行结果
关键点3D交互式可视化
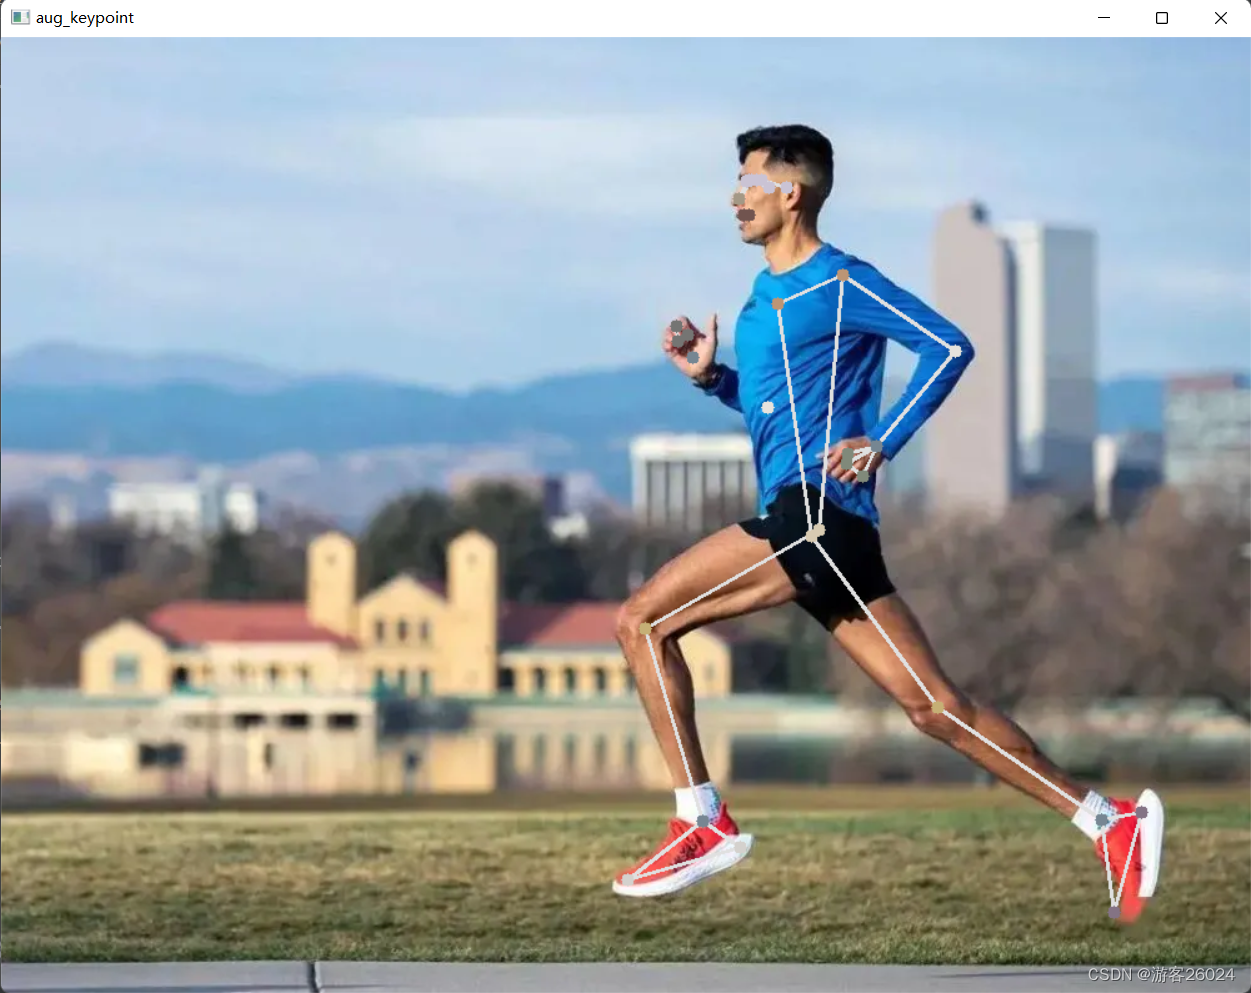
优化显示效果
预测的关键点更加显著
将各个关键点加粗成莫兰迪色
莫兰蒂色卡

因为现在的img通道是bgr,所以调色板的rgb顺序得对换以下
代码优化
import cv2
import numpy as np
import mediapipe as mp


mp_pose = mp.solutions.pose
pose = mp_pose.Pose(static_image_mode=True,
                    model_complexity=2,
                    smooth_landmarks=True,
                    min_detection_confidence=0.5,
                    min_tracking_confidence=0.5)
drawing = mp.solutions.drawing_utils

img = cv2.imread("1.jpg")
height, width, channels = img.shape

point_x = []
point_y = []


# 提取x,y坐标
def get_x_y(each):
    point_x.append(int(each.x * width))
    point_y.append(int(each.y * height))
    return point_x, point_y


if __name__ == '__main__':
    print("height:{}, width:{}".format(height, width))

    results = pose.process(img)
    drawing.draw_landmarks(img, results.pose_landmarks, mp_pose.POSE_CONNECTIONS)
    coords = np.array(results.pose_landmarks.landmark)

    for index, each in enumerate(coords):
        x, y = get_x_y(each)
    points = np.vstack((x, y)).T
    radius = 5
    for index, point in enumerate(points):
        # nose
        if index == 0:
            img = cv2.circle(img, (point[0], point[1]), radius, (133, 152, 164), -1)
        # shoulder
        elif index in [11, 12]:
            img = cv2.circle(img, (point[0], point[1]), radius, (117, 149, 188), -1)
        # hip joint
        elif index in [23, 24]:
            img = cv2.circle(img, (point[0], point[1]), radius, (177, 202, 215), -1)
        # elbow
        elif index in [13, 14]:
            img = cv2.circle(img, (point[0], point[1]), radius, (221, 227, 229), -1)
        # lap
        elif index in [25, 26]:
            img = cv2.circle(img, (point[0], point[1]), radius, (117, 175, 198), -1)
        # wrist and ankle
        elif index in [15, 16, 27, 28]:
            img = cv2.circle(img, (point[0], point[1]), radius, (146, 134, 118), -1)
        # left hand
        elif index in [17, 19, 21]:
            img = cv2.circle(img, (point[0], point[1]), radius, (122, 137, 128), -1)
        # right hand
        elif index in [18, 20, 22]:
            img = cv2.circle(img, (point[0], point[1]), radius, (115, 117, 117), -1)
        # left feet
        elif index in [27, 29, 31]:
            img = cv2.circle(img, (point[0], point[1]), radius, (205, 209, 212), -1)
        # right feet
        elif index in [28, 30, 32]:
            img = cv2.circle(img, (point[0], point[1]), radius, (132, 115, 132), -1)
        # mouth
        elif index in [9, 10]:
            img = cv2.circle(img, (point[0], point[1]), radius, (79, 84, 113), -1)
        # face and eye
        elif index in [1, 2, 3, 4, 5, 6, 7, 8]:
            img = cv2.circle(img, (point[0], point[1]), radius, (212, 195, 202), -1)
        # other
        else:
            img = cv2.circle(img, (point[0], point[1]), radius, (140, 47, 240), -1)

    cv2.imshow("aug_keypoint", img)
    cv2.waitKey(0)
    cv2.destroyAllWindows()
运行结果
实时视频人体姿态估计
1.摄像头拍摄视频实时人体姿态估计
算法核心:摄像头打开后估计人体姿态,10秒钟退出。
若觉得10秒太短,可修改:
if ((time.time() - t0) // 1) == 10:完整代码
import sys
import cv2
import time
import mediapipe as mp

mp_pose = mp.solutions.pose
drawing = mp.solutions.drawing_utils
pose = mp_pose.Pose(static_image_mode=False,
                    model_complexity=1,
                    smooth_landmarks=True,
                    enable_segmentation=True,
                    min_detection_confidence=0.5,
                    min_tracking_confidence=0.5)


def process_frame(img):
    results = pose.process(img)
    drawing.draw_landmarks(img, results.pose_landmarks, mp_pose.POSE_CONNECTIONS)
    return img


if __name__ == '__main__':
    t0 = time.time()
    cap = cv2.VideoCapture(0)
    cap.open(0)
    while cap.isOpened():
        success, frame = cap.read()
        if not success:
            raise ValueError("Error")
        frame = process_frame(frame)
        cv2.imshow("keypoint", frame)
        if ((time.time() - t0) // 1) == 10:
            sys.exit(0)
        cv2.waitKey(1)

    cap.release()
    cv2.destroyAllWindows()
此代码能正常运行,不展示运行结果!
2.视频实时人体姿态估计
算法核心:打开保存好的视频后估计人体姿态,视频读取完后退出。
完整代码
import os
import sys
import cv2
import mediapipe as mp

BASE_DIR = os.path.dirname((os.path.abspath(__file__)))
print(BASE_DIR)
sys.path.append(BASE_DIR)
mp_pose = mp.solutions.pose
drawing = mp.solutions.drawing_utils
pose = mp_pose.Pose(static_image_mode=False,
                    model_complexity=1,
                    smooth_landmarks=True,
                    enable_segmentation=True,
                    min_detection_confidence=0.5,
                    min_tracking_confidence=0.5)


def process_frame(img):
    results = pose.process(img)
    drawing.draw_landmarks(img, results.pose_landmarks, mp_pose.POSE_CONNECTIONS)
    return img


if __name__ == '__main__':
    video_dirs = os.path.join(BASE_DIR, "1.mp4")
    cap = cv2.VideoCapture(video_dirs)
    while cap.isOpened():
        success, frame = cap.read()
        if frame is None:
            break
        if success == True:
            frame = process_frame(frame)
            cv2.imshow("keypoint", frame)
        cv2.waitKey(1)

    cap.release()
    cv2.destroyAllWindows()
运行结果
原视频是最近报爆火的刘耕宏健身操。
人体姿态检测
在这个视频中证明此算法还是存在缺陷,因为视频中无法很好的将两人同时识别。
3.视频实时人体姿态估计代码优化
运用了上面所提及的莫兰迪色系,作为关键点的颜色。
完整代码
import cv2
import time
import numpy as np
from tqdm import tqdm
import mediapipe as mp

mp_pose = mp.solutions.pose
pose = mp_pose.Pose(static_image_mode=True,
                    model_complexity=2,
                    smooth_landmarks=True,
                    min_detection_confidence=0.5,
                    min_tracking_confidence=0.5)
drawing = mp.solutions.drawing_utils


def process_frame(img):
    height, width, channels = img.shape
    start = time.time()
    results = pose.process(img)
    if results.pose_landmarks:
        drawing.draw_landmarks(img, results.pose_landmarks, mp_pose.POSE_CONNECTIONS)
        coords = np.array(results.pose_landmarks.landmark)
        for index, each in enumerate(coords):
            cx = int(each.x * width)
            cy = int(each.y * height)
            cz = each.z
            radius = 5
            # nose
            if index == 0:
                img = cv2.circle(img, (cx, cy), radius, (133, 152, 164), -1)
            # shoulder
            elif index in [11, 12]:
                img = cv2.circle(img, (cx, cy), radius, (117, 149, 188), -1)
            # hip joint
            elif index in [23, 24]:
                img = cv2.circle(img, (cx, cy), radius, (177, 202, 215), -1)
            # elbow
            elif index in [13, 14]:
                img = cv2.circle(img, (cx, cy), radius, (221, 227, 229), -1)
            # lap
            elif index in [25, 26]:
                img = cv2.circle(img, (cx, cy), radius, (117, 175, 198), -1)
            # wrist and ankle
            elif index in [15, 16, 27, 28]:
                img = cv2.circle(img, (cx, cy), radius, (146, 134, 118), -1)
            # left hand
            elif index in [17, 19, 21]:
                img = cv2.circle(img, (cx, cy), radius, (122, 137, 128), -1)
            # right hand
            elif index in [18, 20, 22]:
                img = cv2.circle(img, (cx, cy), radius, (115, 117, 117), -1)
            # left feet
            elif index in [27, 29, 31]:
                img = cv2.circle(img, (cx, cy), radius, (205, 209, 212), -1)
            # right feet
            elif index in [28, 30, 32]:
                img = cv2.circle(img, (cx, cy), radius, (132, 115, 132), -1)
            # mouth
            elif index in [9, 10]:
                img = cv2.circle(img, (cx, cy), radius, (79, 84, 113), -1)
            # face and eye
            elif index in [1, 2, 3, 4, 5, 6, 7, 8]:
                img = cv2.circle(img, (cx, cy), radius, (212, 195, 202), -1)
            # other
            else:
                img = cv2.circle(img, (cx, cy), radius, (140, 47, 240), -1)
    else:
        fail = "fail detection"
        img = cv2.putText(img, fail, (25, 100), cv2.FONT_HERSHEY_SIMPLEX, 1, (0, 255, 0), 3)

    FPS = 1 / (time.time() - start)
    img = cv2.putText(img, "FPS" + str(int(FPS)), (25, 50), cv2.FONT_HERSHEY_SIMPLEX, 1, (0, 255, 0), 3)
    return img


def out_video(input):
    file = input.split("/")[-1]
    output = "out-" + file
    print("It will start processing video: {}".format(input))
    cap = cv2.VideoCapture(input)
    frame_count = int(cap.get(cv2.CAP_PROP_FRAME_COUNT))
    frame_size = (cap.get(cv2.CAP_PROP_FRAME_WIDTH), cap.get(cv2.CAP_PROP_FRAME_HEIGHT))
    # # create VideoWriter,VideoWriter_fourcc is video decode
    fourcc = cv2.VideoWriter_fourcc(*'mp4v')
    fps = cap.get(cv2.CAP_PROP_FPS)
    out = cv2.VideoWriter(output, fourcc, fps, (int(frame_size[0]), int(frame_size[1])))
    # the progress bar
    with tqdm(range(frame_count)) as pbar:

        while cap.isOpened():
            success, frame = cap.read()
            if not success:
                break
            try:
                frame = process_frame(frame)
                out.write(frame)
                pbar.update(1)
            except:
                print("ERROR")
                pass
    pbar.close()
    cv2.destroyAllWindows()
    out.release()
    cap.release()
    print("{} finished!".format(output))


if __name__ == '__main__':
    video_dirs = "1.mp4"
    out_video(video_dirs)
运行结果
pbar程序运行
人体关键点检测优化
很明显比之前的效果更好!
第一次做视频效果不太熟练还请见谅!
下一话
3D视觉——2.人体姿态估计(Pose Estimation)入门——OpenPose含安装、编译、使用(单帧、实时视频)![]() https://blog.csdn.net/XiaoyYidiaodiao/article/details/125565738?spm=1001.2014.3001.5502
https://blog.csdn.net/XiaoyYidiaodiao/article/details/125565738?spm=1001.2014.3001.5502


