最近两年自动驾驶领域有很多在bev视角下做3D检测的工作,纯视觉的bev下检测一个难点就是深度信息的缺失,本篇论文中提供了可选的离散深度值,让2D像素寻找在3D世界中最合理的位置,取得了不错的效果。
来源:杰读源码 微信公众号

论文:Lift, Splat, Shoot: Encoding Images from Arbitrary Camera Rigs by Implicitly Unprojecting to 3D
- 论文:https://arxiv.org/pdf/2008.05711.pdf
- 代码:https://github.com/nv-tlabs/lift-splat-shoot
Abstract
目前的自动驾驶通常将车身周边的所有感知结果投影到一张鸟瞰俯视图上,本论文提出了一个端到端的方法,只需要任意数量的相机输入,即可获得效果很不错的俯视图结果。该方法有两个关键步骤,第一步lift:提取每个相机视锥范围内的特征,第二步spalt:将所有的特征投射到俯视图。经过实验验证,这个思路不仅在检测上取得了很好的效果,而且在多相机的融合也很棒(这意味着对相机的标定误差有较好的鲁棒性)。
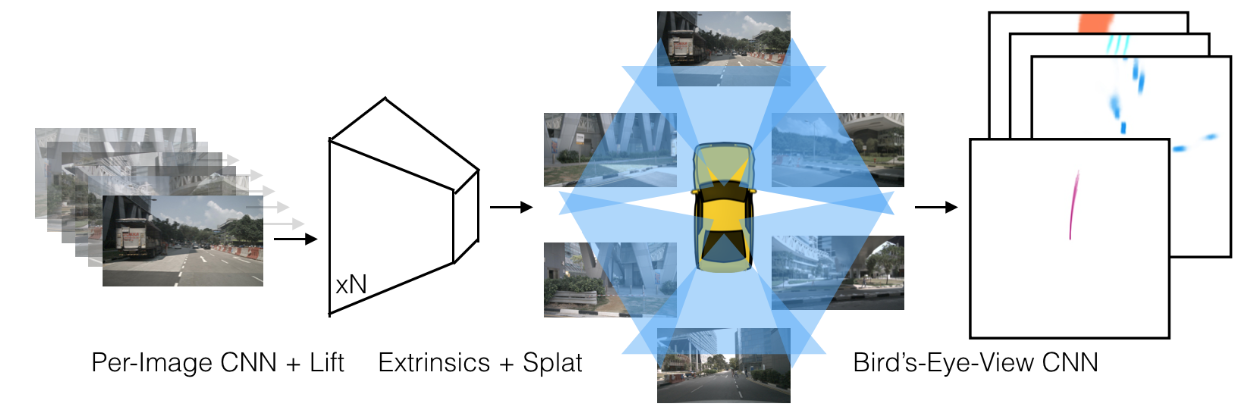
Lift: Latent Depth Distribution
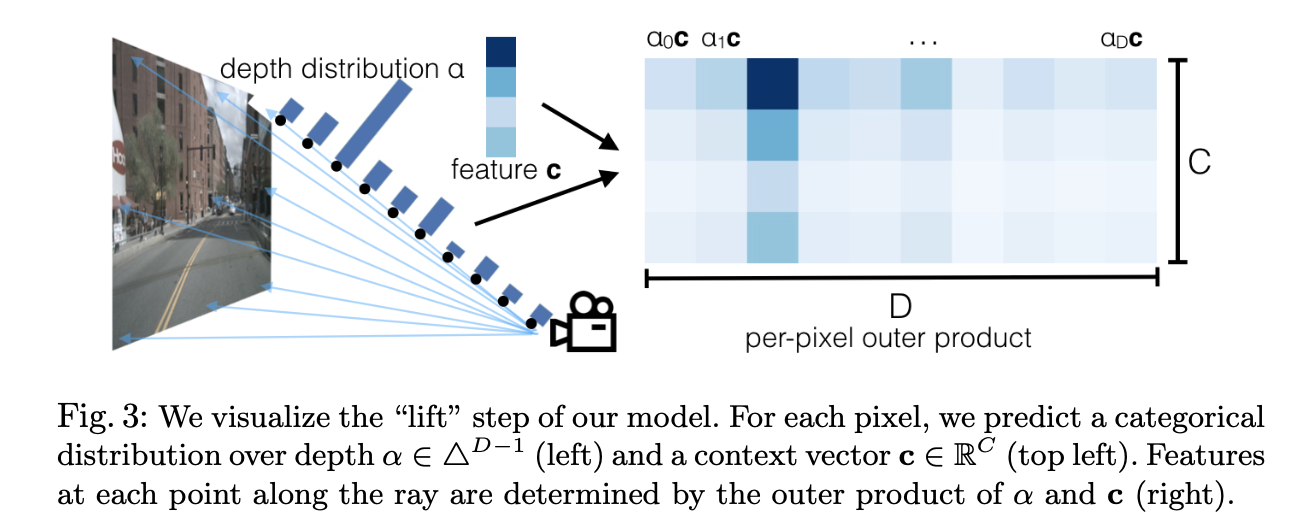
lift的作用是提取2D图像中的像素在以车身坐标为原点的3D世界中的特征。一般来说2D的像素坐标要想投影在3D世界中,必不可少的就是像素点的深度信息,这也是许多3D单目检测论文认为的保证检测精度的重要信息。那么在不依靠深度相机这类设备的情况下,如何获得像素点的深度值呢?这里是论文的创新点:为每个像素点生成一堆离散的深度值,在模型训练的时候,由网络自己选择合适的深度。
怎么为每个像素定义一堆离散的深度值?因为2D图像中的每个像素点可以理解成一条世界中某点到相机中心的一条射线,现在不知道的是该像素具体在射线上位置(也就是不知道该像素的深度值)。官方代码中是这么做的:在距离相机5m到45m的视锥内,每隔1m有一个模型可选的深度值(这样每个像素有41个可选的离散深度值)。
视锥生成源码:
    def create_frustum(self):
        # make grid in image plane
        ogfH, ogfW = self.data_aug_conf['final_dim']
        fH, fW = ogfH // self.downsample, ogfW // self.downsample
        # 5m到45m,1m为间隔生成深度信息
        ds = torch.arange(*self.grid_conf['dbound'], dtype=torch.float).view(-1, 1, 1).expand(-1, fH, fW)
        D, _, _ = ds.shape
        xs = torch.linspace(0, ogfW - 1, fW, dtype=torch.float).view(1, 1, fW).expand(D, fH, fW)
        ys = torch.linspace(0, ogfH - 1, fH, dtype=torch.float).view(1, fH, 1).expand(D, fH, fW)

        # D x H x W x 3
        # 41 x H x W x 3 3代表三个元素:xs,ys为点的坐标,该点为像素坐标,ds为深度信息,在5m~45m内
        frustum = torch.stack((xs, ys, ds), -1)
        return nn.Parameter(frustum, requires_grad=False)
作者设计了CamEncode模块来提取2D图像中在3D空间中的特征,即
深
度
值
信
息
(
s
o
f
t
m
a
x
编
码
)
∗
f
e
a
t
u
r
e
深度值信息(softmax编码)*feature
深度值信息(softmax编码)∗feature,如下图中,相机视锥中一根射线上设置了10个可选深度值,第三个深度下特征最为显著,因此该位置的深度值为第三个。(官方代码中可选的深度值为41个)
class CamEncode(nn.Module):
    def __init__(self, D, C, downsample):
        super(CamEncode, self).__init__()
        self.D = D
        self.C = C

        self.trunk = EfficientNet.from_pretrained("efficientnet-b0")

        self.up1 = Up(320+112, 512)
        # 输出通道数为D+C,D为可选深度值个数,C为特征通道数
        self.depthnet = nn.Conv2d(512, self.D + self.C, kernel_size=1, padding=0)

    def get_depth_dist(self, x, eps=1e-20):
        return x.softmax(dim=1)

    def get_depth_feat(self, x):
        # 主干网络提取特征
        x = self.get_eff_depth(x)
        # 输出通道数为D+C
        x = self.depthnet(x)
        # softmax编码,相理解为每个可选深度的权重
        depth = self.get_depth_dist(x[:, :self.D])
        # 深度值 * 特征 = 2D特征转变为3D空间(俯视图)内的特征
        new_x = depth.unsqueeze(1) * x[:, self.D:(self.D + self.C)].unsqueeze(2)

        return depth, new_x

    def get_eff_depth(self, x):

        ...
        ...

        return x

    def forward(self, x):
        depth, x = self.get_depth_feat(x)

        return x
Splat: Pillar Pooling
经过lift获得了某2D像素点在3D空间的特征,那么该像素具体位于3D空间的哪个坐标位置呢?目前已经得到了像素的2D像素坐标以及深度值,再加上相机的内参以及外参,即可计算得出像素对应的在车身坐标系中的3D坐标。
def get_geometry(self, rots, trans, intrins, post_rots, post_trans):
        """Determine the (x,y,z) locations (in the ego frame)
        of the points in the point cloud.
        Returns B x N x D x H/downsample x W/downsample x 3
        """
        B, N, _ = trans.shape

        # undo post-transformation
        # B x N x D x H x W x 3
        # post_trans和post_rots为图像增强中使用到的仿射变换参数,因为此处要对视锥中的对应点做同样变换
        points = self.frustum - post_trans.view(B, N, 1, 1, 1, 3)
        points = torch.inverse(post_rots).view(B, N, 1, 1, 1, 3, 3).matmul(points.unsqueeze(-1))

        # cam_to_ego 像素坐标系->相机坐标系->车身坐标系
        points = torch.cat((points[:, :, :, :, :, :2] * points[:, :, :, :, :, 2:3],
                            points[:, :, :, :, :, 2:3]
                            ), 5)
        combine = rots.matmul(torch.inverse(intrins))
        points = combine.view(B, N, 1, 1, 1, 3, 3).matmul(points).squeeze(-1)
        points += trans.view(B, N, 1, 1, 1, 3)
        # 得到原先2D的坐标点的位置在车身坐标系下的3D位置
        return points
将多个相机中的像素点投影在同一张俯视图中,先过滤掉感兴趣域(以车身为中心200*200范围)外的点。然后需要注意的是,在俯视图中同一个坐标可能存在多个特征,这里有两个原因:1是单张2D图像不同的像素点可能投影在俯视图中的同一个位置,2是不同相机图像中的不同像素点投影在俯视图中的同一个位置,例如不同相机画面中的同一个目标。对于同一个位置的多个特征,作者使用了sum-pooling的方法计算新的特征,最后得到了200x200xC的feature,源码中C取64。
def voxel_pooling(self, geom_feats, x):
        B, N, D, H, W, C = x.shape
        Nprime = B*N*D*H*W

        # flatten x
        x = x.reshape(Nprime, C)

        # flatten indices
        geom_feats = ((geom_feats - (self.bx - self.dx/2.)) / self.dx).long()
        geom_feats = geom_feats.view(Nprime, 3)
        batch_ix = torch.cat([torch.full([Nprime//B, 1], ix,
                             device=x.device, dtype=torch.long) for ix in range(B)])
        geom_feats = torch.cat((geom_feats, batch_ix), 1)

        # filter out points that are outside box
        kept = (geom_feats[:, 0] >= 0) & (geom_feats[:, 0] < self.nx[0])
            & (geom_feats[:, 1] >= 0) & (geom_feats[:, 1] < self.nx[1])
            & (geom_feats[:, 2] >= 0) & (geom_feats[:, 2] < self.nx[2])
        x = x[kept]
        geom_feats = geom_feats[kept]

        # get tensors from the same voxel next to each other
        # 将所有的feature基于坐标位置进行排序,在俯视图上相同坐标的feature的ranks值相同
        ranks = geom_feats[:, 0] * (self.nx[1] * self.nx[2] * B)
            + geom_feats[:, 1] * (self.nx[2] * B)
            + geom_feats[:, 2] * B
            + geom_feats[:, 3]
        sorts = ranks.argsort()
        x, geom_feats, ranks = x[sorts], geom_feats[sorts], ranks[sorts]

        # cumsum trick
        if not self.use_quickcumsum:
            x, geom_feats = cumsum_trick(x, geom_feats, ranks)
        else:
            x, geom_feats = QuickCumsum.apply(x, geom_feats, ranks)

        # griddify (B x C x Z x X x Y)
        final = torch.zeros((B, C, self.nx[2], self.nx[0], self.nx[1]), device=x.device)
        final[geom_feats[:, 3], :, geom_feats[:, 2], geom_feats[:, 0], geom_feats[:, 1]] = x

        # collapse Z
        final = torch.cat(final.unbind(dim=2), 1)

        return final

def cumsum_trick(x, geom_feats, ranks):
    x = x.cumsum(0)
    kept = torch.ones(x.shape[0], device=x.device, dtype=torch.bool)
    kept[:-1] = (ranks[1:] != ranks[:-1])

    x, geom_feats = x[kept], geom_feats[kept]
    # 获得同一坐标的所有feature的sum
    x = torch.cat((x[:1], x[1:] - x[:-1]))

    return x, geom_feats
最后接个一个BevEncode的模块将200x200xC的特征生成200x200x1的特征用于loss的计算。
Conclusion
最近两年自动驾驶领域有很多在bev视角下做3D检测的工作,纯视觉的bev下检测一个难点就是深度信息的缺失,本篇论文中提供了可选的离散深度值,让2D像素寻找在3D世界中最合理的位置,取得了不错的效果。
如果本文对你有帮助,更多内容请关注微信公众号【杰读源码】


