目录
一、新建Web项目
二、下载前端文件
三、添加Flowable-ui-modeler依赖
四、添加数据源相关配置
五、配置idm
六、绕过Flowable授权
七、配置账号信息接口
一、新建Web项目
1、使用idea创建一个Maven项目,然后添加"spring-boot-starter-web"依赖。整合代码下载地址:https://download.csdn.net/download/wangdaoyin2010/85146346
            org.springframework.boot
            spring-boot-starter-web
注意:使用“spring-boot-starter”进行包版本控制,因此需要添加“spring-boot-starter-parent”作为父包
        org.springframework.boot
        spring-boot-starter-parent
        2.6.6
二、下载前端文件
1、下载flowable-engine-main源码文件
下载地址:https://github.com/flowable/flowable-engine/releases/tag/flowable-6.7.2
2、找到前端文件
解压下载后的文件,找到“flowable-engine-mainmodulesflowable-uiflowable-ui-modeler-frontendsrcmainresourcesstatic”文件夹。将整个”static”文件夹拷贝到自己项目下“resources”目录中。
注意:"static"文件夹中有“modeler”子文件夹,所以要访问页面url路径需要加上“/modeler”,以前的一些版本没有该文件夹。
3、测试前端页面访问
在浏览器中输入“http://localhost:8182/modeler/index.html”进行查看,得到如下图
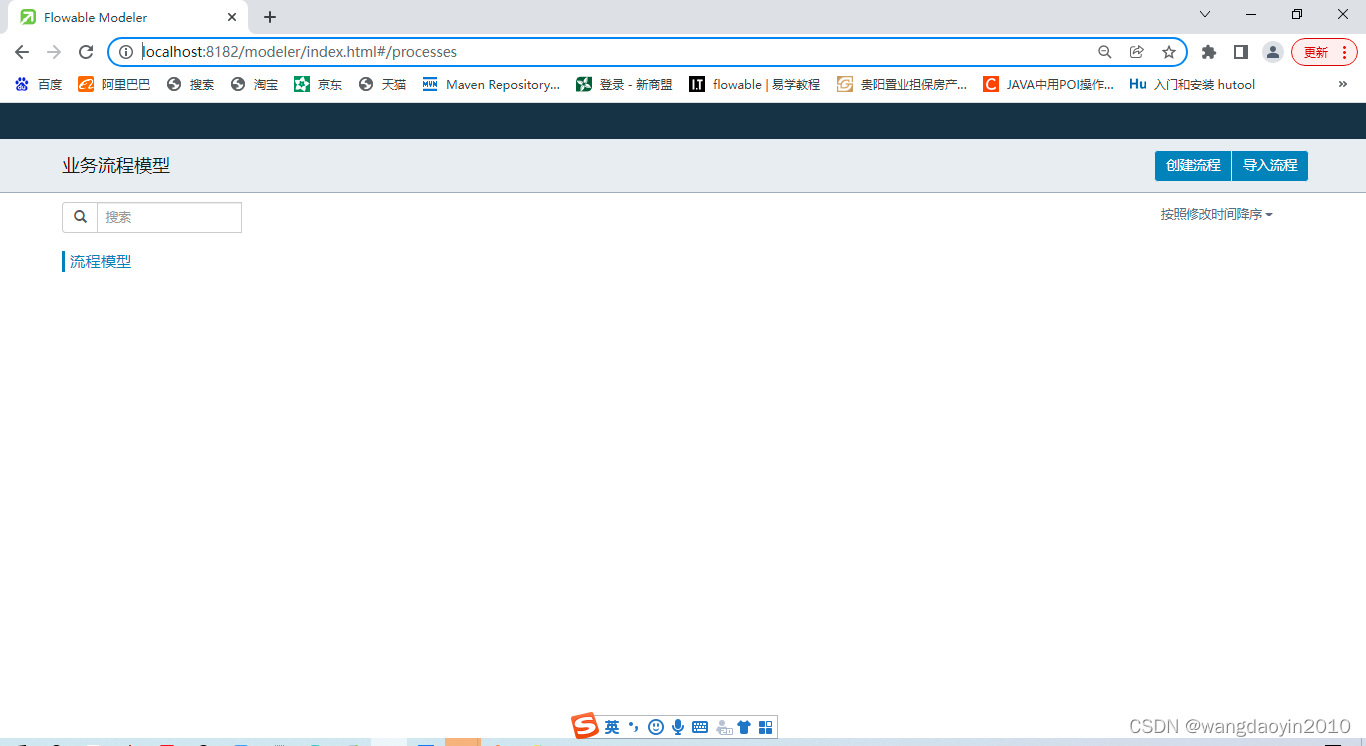
到此前端页面已经添加完成
三、添加Flowable-ui-modeler依赖
1、添加Flowable-ui-modeler相关依赖如下
            org.flowable
            flowable-ui-modeler-rest
            ${flowable.version}


            org.flowable
            flowable-ui-modeler-conf
            ${flowable.version}
2、flowable-ui-modeler-rest说明
该依赖项中包含flowableUI对模型的增删查改等所有模型维护接口
3、flowable-ui-modeler-conf说明
该依赖项中包含了一些ui-modeler的自动化配置项,主要又ApplicationConfiguration自动化配置类进行配置;在该配置类中设置了modeler的基础包扫描路径和一些bean的配置。
其中个人认为比较重要的配置进行说明一下
    @Bean
    public ServletRegistrationBean modelerAppServlet(ApplicationContext applicationContext, ObjectProvider multipartConfig) {
        AnnotationConfigWebApplicationContext dispatcherServletConfiguration = new AnnotationConfigWebApplicationContext();
        dispatcherServletConfiguration.setParent(applicationContext);
        dispatcherServletConfiguration.register(AppDispatcherServletConfiguration.class);
        DispatcherServlet servlet = new DispatcherServlet(dispatcherServletConfiguration);
        //处理所有"/modeler-app/"路径下请求,因为在前端js配置文件app-cfg.js中有基础路径配置
        //FLOWABLE.CONFIG = {
        // 'onPremise' : true,
        // 'contextRoot' : pathname,
        // 'contextModelerRestRoot' : pathname + '/modeler-app',
        // 'webContextRoot' : pathname,
        // 'datesLocalization' : false
        //};
        //在请求路配置文件url-config.js中配置请求基本都添加了"/modeler-app",如下
        // getCloneModelsUrl: function (modelId) {
        //        return FLOWABLE.CONFIG.contextModelerRestRoot + '/rest/models/' + modelId + '/clone';
        //    },
        //
        //    getModelHistoriesUrl: function (modelId) {
        //        return FLOWABLE.CONFIG.contextModelerRestRoot + '/rest/models/' + modelId + '/history';
        //    }
        ServletRegistrationBean registrationBean = new ServletRegistrationBean(servlet, "/modeler-app/*");
        registrationBean.setName("Flowable Modeler App Servlet");
        registrationBean.setLoadOnStartup(1);
        registrationBean.setAsyncSupported(true);
        multipartConfig.ifAvailable(registrationBean::setMultipartConfig);
        return registrationBean;
    }

    @Bean
    public WebMvcConfigurer modelerApplicationWebMvcConfigurer() {
        return new WebMvcConfigurer() {

            @Override
            public void addViewControllers(@NonNull ViewControllerRegistry registry) {

                //这个地方让前端"/"访问更路径的时候最终重定向到"/modeler/index.html"
                if (!ClassUtils.isPresent("org.flowable.ui.task.conf.ApplicationConfiguration", getClass().getClassLoader())) {
                    // If the task application is not present, then the root should be mapped to admin
                    registry.addViewController("/").setViewName("redirect:/modeler/");
                }
                //这个地方让前端"/modeler"或者"/modeler/"访问路径重定向到"/modeler/index.html",让前端访问的时候使用"/modeler"或者"/modeler/"进行访问
                //主要目的是在页面发送数据请求时,会在路径后面添加具体路径参数
                //如:http://localhost:8182/modeler/index.html/flow-app/rest/account
                //及http://localhost:8182/modeler/index.html/modeler-app/rest/models?filter=processes&modelType=0&sort=modifiedDesc
                //数据请求都是在http://localhost:8182/modeler/index.html路径后面添加子路径及参数
                // 所以让前端不通过"/modeler"或者"/modeler/"来访问,方便添加子路径进行路径映射
                registry.addViewController("/modeler").setViewName("redirect:/modeler/");
                registry.addViewController("/modeler/").setViewName("forward:/modeler/index.html");
            }
        };
    }
四、添加数据源相关配置
添加flowable-ui-modeler相关依赖后,我们启动应用,发现不能启动,错误如下,大概意思就是没有配置数据源

1、添加数据库配置和依赖
我们使用MySql数据库,所以添加MySQL相关依赖和数据库配置
            org.springframework
            spring-jdbc


            mysql
            mysql-connector-java
            8.0.28
#  数据库配置
spring:
  datasource:
    hikari:
      idleTimeout: 300000
      maxLifetime: 600000
      maximumPoolSize: 50
      minimumIdle: 5
    driver-class-name: com.mysql.cj.jdbc.Driver
    url: jdbc:mysql://116.63.182.247:3306/ry_flow?useUnicode=true&characterEncoding=utf8&autoReconnect=true&useSSL=false
    username: root
    password: LtRoot123
五、配置idm
再次启动服务,发现如下错误


原因是没有进行Flowable默认使用idm授权,需要对idm授权信息进行配置,添加对应idm配置如下
flowable:
  common:
    app:
#      目前先设置一个正确但是不一定可用的url地址
      idm-url: http://localhost:8080/flowable-idm1
      idm-admin:
#        需要设置一个密码,目前先设置,后期不使用
        password: test
#        默认user为admin,这个地方可设置可不设置
        user: admin1
六、绕过Flowable授权
再次启动应用,成功启动,然后访问“http://localhost:8182/modeler”
发现跳转到“http://localhost:8080/flowable-idm1/idm/#/login?redirectOnAuthSuccess=true&redirectUrl=http://localhost:8182/modeler/”
该地址中“http://localhost:8080/flowable-idm1”就是前面我们配置idm认证授权地址。说明要访问页面需要进行授权,在这个地方我们不进行授权,直接配置绕过Flowable中的授权
1、Flowable授权说明
Flowable授权配置在FlowableUiSecurityAutoConfiguration类中,在该类中我们可以看到如下代码,该部分代码说明默认使用“idm”方式进行授权
  @Configuration(proxyBeanMethods = false)
    @Order(SecurityConstants.FORM_LOGIN_SECURITY_ORDER)
    @ConditionalOnProperty(prefix = "flowable.common.app.security", name = "type", havingValue = "idm", matchIfMissing = true)
    public static class FormLoginWebSecurityConfigurerAdapter extends WebSecurityConfigurerAdapter {

        @Autowired
        protected ObjectProvider rememberMeServicesObjectProvider;

        @Autowired
        protected FlowableCommonAppProperties commonAppProperties;

        @Override
        protected void configure(HttpSecurity http) throws Exception {
            RememberMeServices rememberMeServices = rememberMeServicesObjectProvider.getIfAvailable();
            String key = null;
            if (rememberMeServices instanceof AbstractRememberMeServices) {
                key = ((AbstractRememberMeServices) rememberMeServices).getKey();
            }
            if (rememberMeServices != null) {
                http.rememberMe()
                        .key(key)
                        .rememberMeServices(rememberMeServices);
            }
            http
                    .exceptionHandling()
                    .and()
                    .sessionManagement()
                    .sessionCreationPolicy(SessionCreationPolicy.STATELESS)
                    .and()
                    .logout(logout -> {
                        DEFAULT_LOGOUT.customize(logout);
                        logout.logoutSuccessUrl("/");
                        logout.addLogoutHandler(new ClearFlowableCookieLogoutHandler());
                    })
                    .csrf()
                    .disable() // Disabled, cause enabling it will cause sessions
                    .headers(DEFAULT_HEADERS)
                    // Never persist the security context
                    .securityContext().securityContextRepository(new NullSecurityContextRepository())
                    .and()
                    .authorizeRequests(DEFAULT_AUTHORIZE_REQUESTS)
            ;

            http.formLogin().disable();
            http.apply(new FlowableUiCustomFormLoginConfigurer());
        }
    }
2、绕过Flowable授权
为了绕过授权,需要添加一个自定义授权配置绕过Flowable的默认idm授权,创建一个授权配置类“SecurityConfiguration”,该类在什么位置都可以,不用覆盖原有授权配置类
@Configuration
public class SecurityConfiguration {
    @Configuration(proxyBeanMethods = false)
    //Order配置说明
    // 这个地方相同会报错
    //这个地方如果大于则该配置在FlowableUiSecurityAutoConfiguratio中对应项后加载,不能起到绕过授权作用
    //所以这个地方-1让该配置项在FlowableUiSecurityAutoConfiguratio中对应配置项前加载,以跳过授权
    @Order(SecurityConstants.FORM_LOGIN_SECURITY_ORDER - 1)
    public static class FormLoginWebSecurityConfigurerAdapter extends WebSecurityConfigurerAdapter {
        @Override
        protected void configure(HttpSecurity http) throws Exception {
            http
                    //必须要将csrf设置为disable,不然后面发送POST请求时会报403错误
                    .csrf().disable()
                    //为了简单起见,简单粗暴方式直接放行modeler下面所有请求
                    .authorizeRequests().antMatchers("/modeler/**").permitAll();
        }
    }
}
七、配置账号信息接口
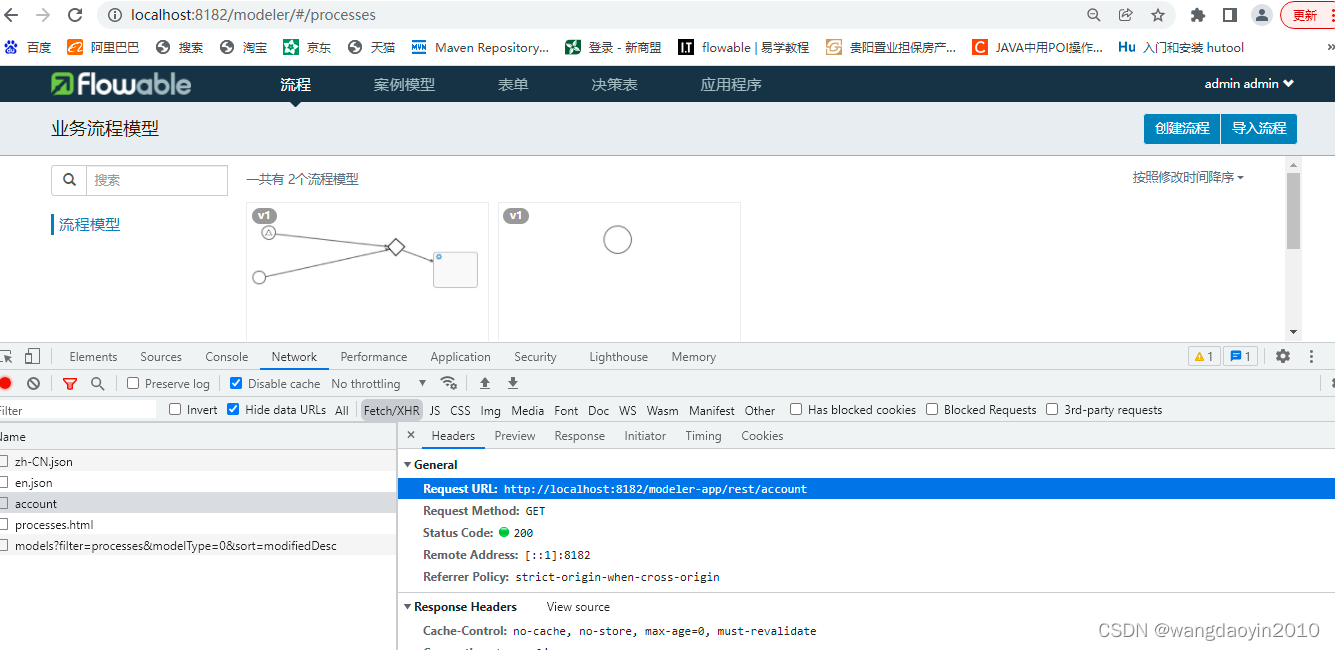
再次启动并访问“http://localhost:8182/modeler”得到结果如下图
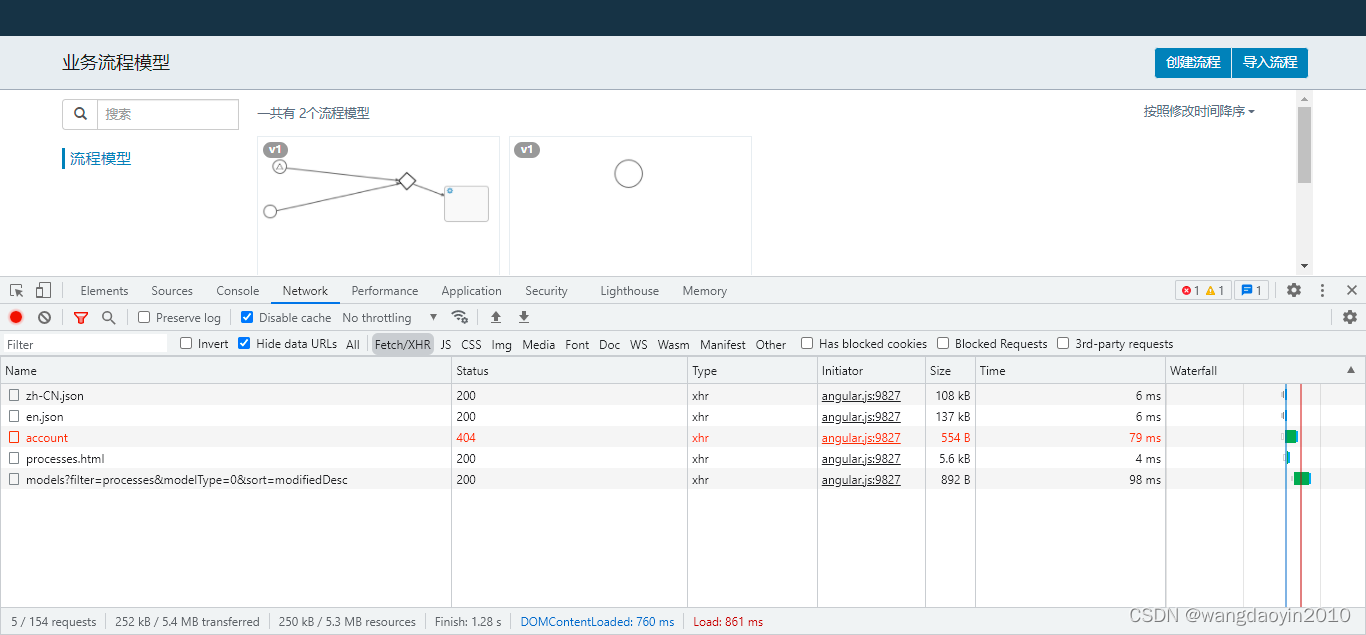
其中报红请求为“http://localhost:8182/modeler-app/rest/account”,该请求为获取当前用户信息接口
1、/rest/account请求说明
“/rest/account”接口在“RemoteAccountResource”类中定义,该类中核心代码如下
@RestController
@RequestMapping({
        "/app",
        "/"
})
public class RemoteAccountResource implements InitializingBean {
  /**
     * GET /rest/account -> get the current user.
     */
    @GetMapping(value = "/rest/account", produces = "application/json")
    public UserRepresentation getAccount(Authentication authentication) {
        UserRepresentation userRepresentation = null;

        for (CurrentUserProvider userProvider : currentUserProviders) {
            if (userProvider.supports(authentication)) {
                userRepresentation = userProvider.getCurrentUser(authentication);
            }

            if (userRepresentation != null) {
                break;
            }

        }

        if (userRepresentation == null) {
            userRepresentation = getCurrentUserRepresentation(authentication.getName());
        }

        if (userRepresentation != null) {
            return userRepresentation;
        } else {
            throw new NotFoundException();
        }
    }
}
其中getAccount方法就是对应报错请求
2、覆盖RemoteAccountResource类
创建一个类覆盖原来的RemoteAccountResource类(该类所在的包名、类名必须与原类相同弄才能覆盖),在该类中重新实现getAccount方法,直接返回一个用户信息既可。
注意:因为返回的用户信息,前端需要判断角色权限,所以最好该方法中会添加一些角色权限信息返回。直接使用如下代码既可
@RestController
@RequestMapping({
        "/app",
        "/"
})
public class RemoteAccountResource {
    /**
     * GET /rest/account -> get the current user.
     */
    @RequestMapping(value = "/rest/account", method = RequestMethod.GET, produces = "application/json")
    public UserRepresentation getAccount() {
        UserRepresentation userRepresentation = new UserRepresentation();
        userRepresentation.setFirstName("admin");
        userRepresentation.setLastName("admin");
        userRepresentation.setFullName("admin");
        userRepresentation.setId("admin");
        List pris = new ArrayList();
        pris.add(DefaultPrivileges.ACCESS_MODELER);
        pris.add(DefaultPrivileges.ACCESS_IDM);
        pris.add(DefaultPrivileges.ACCESS_ADMIN);
        pris.add(DefaultPrivileges.ACCESS_TASK);
        pris.add(DefaultPrivileges.ACCESS_REST_API);
        userRepresentation.setPrivileges(pris);

        if (userRepresentation != null) {
            return userRepresentation;
        } else {
            throw new NotFoundException();
        }
    }
}
注意: 6.7.2版本中前端请求url-config.js配置文件中的请求地址与前面版本不同,需要注意


