该篇文章已经被专栏《从零开始学k8s》收录
上一篇文章:k8spod的容器探测与启动策略 点击跳转

核心技术controller
- 什么是Controller
- Pod和Controller的关系
- Replicaset 控制器
- Replicaset 概述
- Replicaset 工作原理:如何管理 Pod?
- Replicaset 资源清单文件编写技巧
- Replicaset 管理 pod:扩容、缩容、更新
- 写在最后
前面我们学习了 Pod,那我们在定义 pod 资源时,可以直接创建一个 kind:Pod 类型的自主式 pod, 但是这存在一个问题,假如 pod 被删除了,那这个 pod 就不能自我恢复,就会彻底被删除,线上这种情况非常危险,所以今天就给大家讲解下 pod 的控制器,所谓控制器就是能够管理 pod,监测 pod 运行状况,当 pod 发生故障,可以自动恢复 pod。也就是说能够代我们去管理 pod 中间层,并帮助我们确保每一个 pod 资源始终处于我们所定义或者我们所期望的目标状态,一旦 pod 资源出现故障,那么控制器会尝试重启 pod 或者里面的容器,如果一直重启有问题的话那么它可能会基于某种策略来进行重新布派或者重新编排;如果 pod 副本数量低于用户所定义的目标数量,它也会自动补全;如果多余,也会自动终止 pod 资源。
什么是Controller
Controller是在集群上管理和运行容器的对象,Controller是实际存在的,Pod是虚拟机的
Pod和Controller的关系
Pod是通过Controller实现应用的运维,比如弹性伸缩,滚动升级等
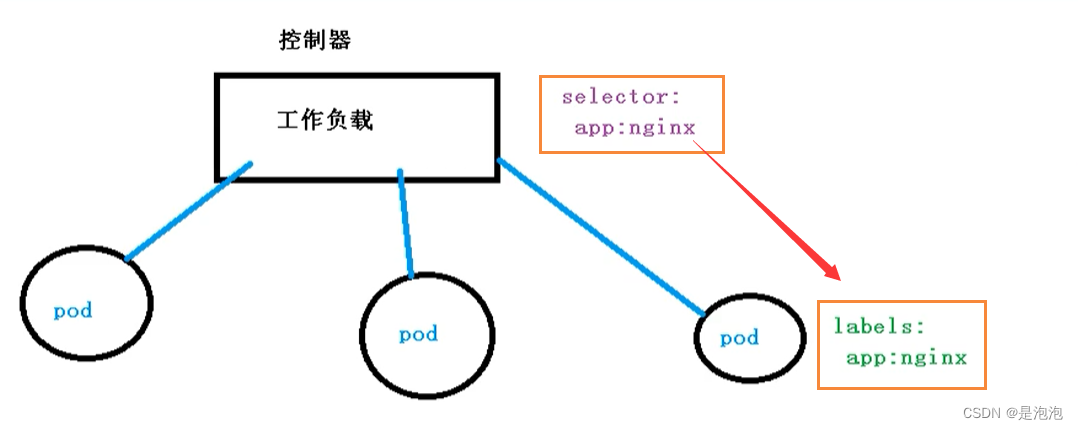
Pod 和 Controller之间是通过label标签来建立关系,同时Controller又被称为控制器工作负载

Replicaset 控制器
Replication Controller 简称 RC,是K8S中的复制控制器。RC是K8S集群中最早的保证Pod高可用的API对象。通过监控运行中的Pod来保证集群中运行指定数目的Pod副本。指定的数目可以是多个也可以是1个;少于指定数目,RC就会启动新的Pod副本;多于指定数目,RC就会杀死多余的Pod副本。
即使在指定数目为1的情况下,通过RC运行Pod也比直接运行Pod更明智,因为RC也可以发挥它高可用的能力,保证永远有一个Pod在运行。RC是K8S中较早期的技术概念,只适用于长期伺服型的业务类型,比如控制Pod提供高可用的Web服务。
ReplicaSet 简称 RS,也就是副本集。RS是新一代的RC,提供同样高可用能力,区别主要在于RS后来居上,能够支持更多种类的匹配模式。副本集对象一般不单独使用,而是作为Deployment的理想状态参数来使用
Replicaset 概述
ReplicaSet 简称 RS,也就是副本集。RS是新一代的RC,提供同样高可用能力,区别主要在于RS后来居上,能够支持更多种类的匹配模式。副本集对象一般不单独使用,而是作为Deployment的理想状态参数来使用,它的主要作用是控制由其管理的 pod,使 pod 副本的数量始终维持在预设的个数。它的主要作用就是保证一定数量的 Pod 能够在集群中正常运行,它会持续监听这些 Pod 的运行状态,在 Pod 发生故障时重启pod,pod数量减少时重新运行新的Pod副本。
官方推荐不要直接使用ReplicaSet,用Deployments取而代之,Deployments 是比 ReplicaSet 更高级的概念,它会管理 ReplicaSet 并提供很多其它有用的特性,最重要的是 Deployments 支持声明式更新,声明式更新的好处是不会丢失历史变更。所以 Deployment 控制器不直接管理 Pod 对象,而是由 Deployment 管理 ReplicaSet,再由 ReplicaSet 负责管理 Pod 对象。
Replicaset 工作原理:如何管理 Pod?
Replicaset 核心作用在于代用户创建指定数量的 pod 副本,并确保 pod 副本一直处于满足用户期望的数量, 起到多退少补的作用,并且还具有自动扩容缩容等机制。
Replicaset 控制器主要由三个部分组成:
1、用户期望的 pod 副本数:用来定义由这个控制器管控的 pod 副本有几个
2、标签选择器:选定哪些 pod 是自己管理的,如果通过标签选择器选到的 pod 副本数量少于我们 指定的数量,需要用到下面的组件
3、pod 资源模板:如果集群中现存的 pod 数量不够我们定义的副本中期望的数量怎么办,需要新 建 pod,这就需要 pod 模板,新建的pod 是基于模板来创建的。
Replicaset 资源清单文件编写技巧
#查看定义 Replicaset 资源需要的字段有哪些?
[root@k8smaster ~]# kubectl explain replicaset
KIND:     ReplicaSet
VERSION:  apps/v1

DESCRIPTION:
     ReplicaSet ensures that a specified number of pod replicas are running at
     any given time.

FIELDS:
   apiVersion	<string>		#当前资源使用的 api 版本,跟 VERSION: apps/v1 保持一致

   kind	<string>				#资源类型,跟 KIND: ReplicaSet 保持一致

   metadata	<Object>			#元数据,定义 Replicaset 名字的

   spec	<Object>				#定义副本数、定义标签选择器、定义 Pod 模板

   status	<Object>			#状态信息,不能改

#查看 replicaset 的 spec 字段如何定义?
[root@k8smaster ~]# kubectl explain rs.spec
KIND:     ReplicaSet
VERSION:  apps/v1

RESOURCE: spec <Object>

DESCRIPTION:
     Spec defines the specification of the desired behavior of the ReplicaSet.
     More info:
     https://git.k8s.io/community/contributors/devel/sig-architecture/api-conventions.md#spec-and-status

     ReplicaSetSpec is the specification of a ReplicaSet.

FIELDS:
   minReadySeconds	<integer>

   replicas	<integer>				#定义的 pod 副本数,根据我们指定的值创建对应数量的 pod

   selector	<Object> -required-		#用于匹配 pod 的标签选择器

   template	<Object>				#定义 Pod 的模板,基于这个模板定义的所有 pod 是一样的

#查看 replicaset 的 spec.template 字段如何定义?
#对于 template 而言,其内部定义的就是 pod,pod 模板是一个独立的对象
[root@k8smaster ~]# kubectl explain rs.spec.template
KIND:     ReplicaSet
VERSION:  apps/v1

RESOURCE: template <Object>

DESCRIPTION:
     Template is the object that describes the pod that will be created if
     insufficient replicas are detected. More info:
     https://kubernetes.io/docs/concepts/workloads/controllers/replicationcontroller#pod-template

     PodTemplateSpec describes the data a pod should have when created from a
     template

FIELDS:
   metadata	<Object>

   spec	<Object>

[root@k8smaster ~]# kubectl explain rs.spec.template.spec

通过上面可以看到,ReplicaSet 资源中有两个 spec 字段。第一个 spec 声明的是 ReplicaSet 定义多少个 Pod 副本(默认将仅部署 1 个 Pod)、匹配 Pod 标签的选择器、创建 pod 的模板。第二个 spec 是spec.template.spec,主要用于 Pod 里的容器属性等配置。
.spec.template 里的内容是声明 Pod 对象时要定义的各种属性,所以这部分也叫做 PodTemplate(Pod 模板)。还有一个值得注意的地方是:在.spec.selector 中定义的标签选择器必须能够匹配到 spec.template.metadata.labels 里定义的 Pod 标签,否则 Kubernetes 将不允许创建 ReplicaSet。

3、Replicaset 使用案例:部署 Guestbook 留言板
[root@k8snode2 ~]# docker pull konradkleine/docker-registry-frontend:v2
[root@k8snode ~]# docker pull konradkleine/docker-registry-frontend:v2
#编写一个 ReplicaSet 资源清单
[root@k8smaster node]# vim replicaset.yaml
apiVersion: apps/v1
kind: ReplicaSet
metadata:
  name: frontend
  labels:
    app: guestbook
    tier: frontend
spec:
  replicas: 3
  selector:
    matchLabels:
      tier: frontend
  template:
    metadata:
      labels:
        tier: frontend
    spec:
      containers:
      - name: php-redis
        image: konradkleine/docker-registry-frontend:v2
        imagePullPolicy: IfNotPresent
        command: ["/bin/bash","-ce","tail -f /dev/null"]
[root@k8smaster node]# kubectl apply -f replicaset.yaml
replicaset.apps/frontend created
[root@k8smaster node]# kubectl get rs
NAME              DESIRED   CURRENT   READY   AGE
frontend          3         3         3       17s
[root@k8smaster node]# kubectl get pods
NAME                    READY   STATUS    RESTARTS   AGE
frontend-6x5gl          1/1     Running   0          28s
frontend-ncgcj          1/1     Running   0          28s
frontend-z74hg          1/1     Running   0          28s
#pod 的名字是由控制器的名字-随机数组成的 如果yaml怕写错可以explain rs 看一下字段或者复制

#资源清单详细说明
apiVersion: apps/v1 #ReplicaSet 这个控制器属于的核心群组
kind: ReplicaSet #创建的资源类型
metadata:
 name: frontend #控制器的名字
 labels:
 app: guestbook
 tier: frontend
spec:
 replicas: 3 #管理的 pod 副本数量
 selector:
 matchLabels:
 tier: frontend #管理带有 tier=frontend 标签的 pod
 template: #定义 pod 的模板
 metadata:
 labels:
 tier: frontend
#pod 标签,一定要有,这样上面控制器就能找到它要管理的 pod 是哪些了
 spec:
 containers: #定义 pod 里运行的容器
 - name: php-redis #定义容器的名字
 image:  konradkleine/docker-registry-frontend:v2
 ports: #定义端口
- name: http #定义容器的名字
containerPort: 80 #定义容器暴露的端口
Replicaset 管理 pod:扩容、缩容、更新
#Replicaset 实现 pod 的动态扩容
ReplicaSet 最核心的功能是可以动态扩容和回缩,如果我们觉得两个副本太少了,想要增加,只需要修改配置文件 replicaset.yaml 里的 replicas 的值即可,原来 replicas: 3,现在变成 replicaset: 5,修改之后,执行如下命令更新
[root@k8smaster node]# kubectl apply -f replicaset.yaml
replicaset.apps/frontend configured
[root@k8smaster node]# kubectl get pods
NAME                    READY   STATUS    RESTARTS   AGE
frontend-6x5gl          1/1     Running   0          61m
frontend-fk5vl          1/1     Running   0          8s
frontend-lvclg          1/1     Running   0          8s
frontend-ncgcj          1/1     Running   0          61m
frontend-z74hg          1/1     Running   0          61m
[root@k8smaster node]# kubectl get rs
NAME              DESIRED   CURRENT   READY   AGE
frontend          5         5         5       61m
 #也可以直接编辑控制器实现扩容
#这个是我们把请求提交给了 apiserver,实时修改
[root@k8smaster node]# kubectl edit rs frontend
replicaset.apps/frontend edited
#可以开两个窗口 动态查看
[root@k8smaster node]# kubectl get pods -w

#Replicaset 实现 pod 的动态缩容
如果我们觉得 5 个 Pod 副本太多了,想要减少,只需要修改配置文件 replicaset.yaml 里的replicas 的值即可,把 replicaset:4 变成 replicas: 3,修改之后,执行如下命令更新
[root@k8smaster node]# kubectl apply -f replicaset.yaml
[root@k8smaster node]# kubectl get rs
NAME              DESIRED   CURRENT   READY   AGE
frontend          3         3         3       64m
[root@xianchaomaster1 ~]# kubectl get pods
NAME READY STATUS RESTARTS AGE
frontend-j6twz 1/1 Running 0 70m
frontend-lcnq6 1/1 Running 0 70m

#Replicaset 实现 pod 的更新
#修改镜像变成image: nginx,修改之后保存退出
[root@k8smaster node]# vim replicaset.yaml
#把里面 command: ["/bin/bash","-ce","tail -f /dev/null"]删除 并且image改成nginx
[root@k8smaster node]# kubectl get rs -o wide
NAME              DESIRED   CURRENT   READY   AGE   CONTAINERS   IMAGES   SELECTOR
frontend          3         3         3       67m   php-redis    nginx    tier=frontend
#上面可以看到镜像变成了 nginx,说明滚动升级成功了
[root@k8smaster node]# kubectl get pods -o wide
NAME                    READY   STATUS    RESTARTS   AGE   IP            NODE       NOMINATED NODE   READINESS GATES
frontend-6x5gl          1/1     Running   0          68m   10.244.1.11   k8snode2   <none>           <none>
frontend-ncgcj          1/1     Running   0          68m   10.244.2.26   k8snode    <none>           <none>
frontend-z74hg          1/1     Running   0          68m   10.244.1.12   k8snode2   <none>           <none>
#虽然镜像已经更新了,但是原来的 pod 使用的还是之前的镜像,新创建的 pod 才会使用最新的镜像
[root@k8smaster node]# kubectl delete pods frontend-6x5gl			第一个终端删除
pod "frontend-6x5gl" deleted
[root@k8smaster node]# kubectl get pods -w							第二个终端
NAME                    READY   STATUS    RESTARTS   AGE
frontend-6x5gl          1/1     Running   0          71m
frontend-ncgcj          1/1     Running   0          71m
frontend-z74hg          1/1     Running   0          71m
frontend-6x5gl          1/1     Terminating   0          71m
frontend-t8x72          0/1     Pending       0          0s
frontend-t8x72          0/1     Pending       0          0s
frontend-t8x72          0/1     ContainerCreating   0          0s
frontend-t8x72          1/1     Running             0          1s
#重新生成了一个新的 pod:frontend-t8x72
[root@k8smaster node]# curl 10.244.2.30
<!DOCTYPE html>
<html>
<head>
<title>Welcome to nginx!</title>
<style>
html { color-scheme: light dark; }
body { width: 35em; margin: 0 auto;
font-family: Tahoma, Verdana, Arial, sans-serif; }
</style>
</head>
<body>
<h1>Welcome to nginx!</h1>
<p>If you see this page, the nginx web server is successfully installed and
working. Further configuration is required.</p>

<p>For online documentation and support please refer to
<a href="http://nginx.org/">nginx.org</a>.<br/>
Commercial support is available at
<a href="http://nginx.com/">nginx.com</a>.</p>

<p><em>Thank you for using nginx.</em></p>
</body>
</html>
#新生成的 pod 的镜像已经变成了nginx 的,说明更新完成了
生产环境如果升级,可以删除一个 pod,观察一段时间之后没问题再删除另一个 pod,但是这样需要人工干预多次;实际生产环境一般采用蓝绿发布,原来有一个 rs1,再创建一个 rs2(控制器),通过修改 service 标签,修改 service 可以匹配到 rs2 的控制器,这样才是蓝绿发布,这个也需要我们精心的部署规划,我们有一个控制器就是建立在 rs 之上完成的,叫做 Deployment。
写在最后
创作不易,如果觉得内容对你有帮助,麻烦给个三连关注支持一下我!如果有错误,请在评论区指出,我会及时更改!
目前正在更新的系列:从零开始学k8s
感谢各位的观看,文章掺杂个人理解,如有错误请联系我指出~


